IDM PowerTips
Configure word wrap and tab settings based on file type
UltraEdit and UEStudio allow you to customize the Word Wrap and Tab Settings for any type of file. By customizing the Tab Settings, you can specify the number of spaces UltraEdit uses for indentation when the TAB button is pressed on the keyboard. Additionally, by configuring Word Wrap, you can specify whether your text is wrapped at the window’s edge or at a specific column.
How to configure word wrap and tab settings for different file types
To configure the Word Wrap/Tab Settings, access the Advanced Configuration panel by going to Advanced : Configuration. These settings are located under Editor : Word Wrap : Tab Settings.
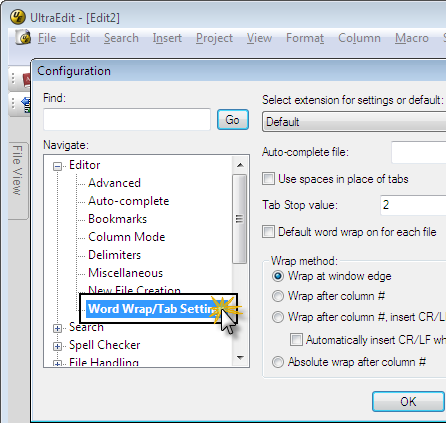
Step 1: Add File Extensions for Word Wrap/Tab Settings
In order to specify Word Wrap and Tab Settings for different file types, you must first add the file extensions used by these file types to the configuration dialog. To do this, click the “Change List ” buttonat the top of the dialog. This will bring up a separate dialog where you can add file extensions for custom Word Wrap/Tab Settings.
Note: If the file type is already defined in the “Select Extension” list, you may skip this step and proceed to step 2.
To add a new file type to the configuration, you will need to type the file extension(s), for that file type into the File Extensions text field as shown in the screenshot below. You do not need to include a period or any other special characters in order for the editor to detect your file type and apply your custom Word Wrap/Tab Settings. You may add or edit up to 10 extension types in this dialog.
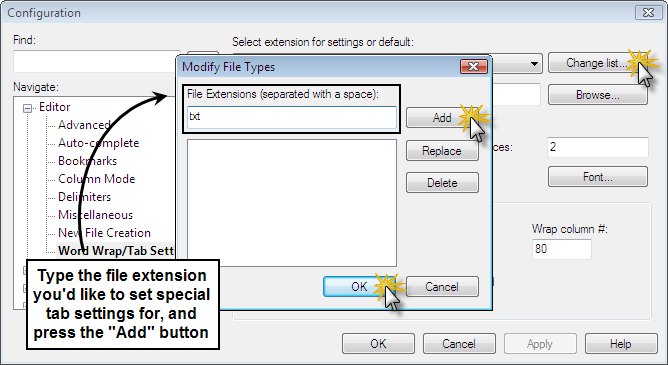
You may also group multiple file extensions together by separating them with a space. So, if you wanted the Word Wrap/Tab Settings for HTML to be the same as those for TXT, you could add the following:
txt html
After you’ve typed your file extension, you’ll need to click the “Add” button to add it to the File Types list, and then click “OK” to return to the main configuration window. Finally you will need to restart the program to see your changes take effect.
Step 2: Specify Tab Settings for File Extension
In order to configure the Tab Settings for the file extension(s) you’ve added, you will need to select the extension from the file extension drop-down boxas shown in the screenshot below.
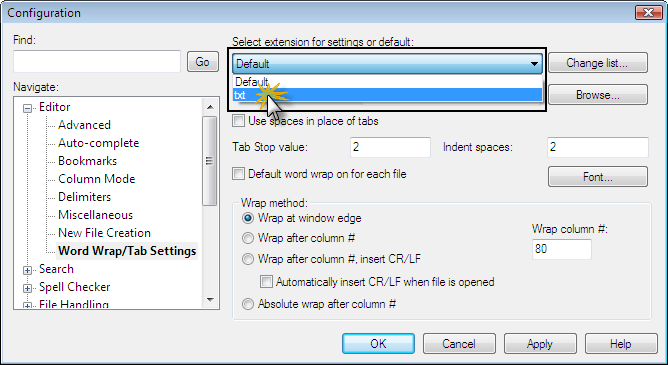
Step 3: Change Tab Settings
After you’ve selected the appropriate file extension, you may begin customizing the Tab settings in the Configuration dialog.
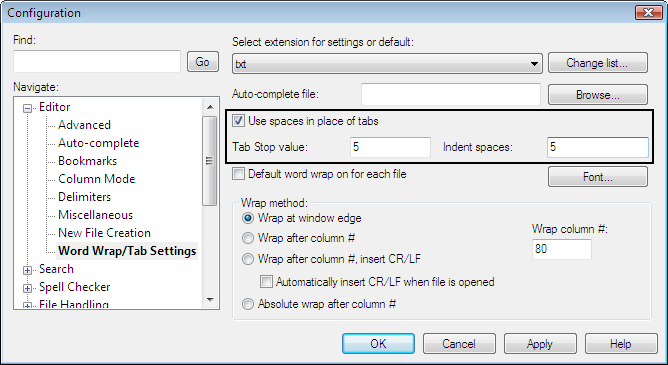
The following options are available to you for Tab Settings:
Use spaces in place of Tabs
Turning this option on will cause the editor to replace tab characters with spaces. The number of spaces used for this is determined by the “Indent Spaces” value.
Tab Stop Value
This specifies the number of spaces a in a tab stop (when you press the TAB key).
You may define up to 12 different tab stop values in this dialog. This is especially useful for comma-delimited files. For instance, if you wanted your first two tabs for a line to be equal to 4 spaces, and your third tab for the line to equal 8 spaces, you would enter “4,4,8”. If you use more than the defined number of tabs, the last value you entered would be used for all subsequent tabs.
If you enable the option to replace tabs with spaces, the editor will insert spaces in place of tabs but will maintain the tab stop spacing using the number of spaces specified.
Note: this applies to only to tab characters entered after this setting is changed; therefore existing tab characters in the document are not affected by these settings.
Indent Spaces
This specifies the number of spaces to use in place of a tab character. This allows you to have one setting when using tabs and a different one when using spaces.
The Indent Spaces value specifies how many spaces are used for an indent when the TAB key is used ONLY WHEN “Use Spaces in Place of Tabs” is set. In this case the “Tab Stop Value” tells the editor to expand actual tab characters on the appropriate tab stop boundary.
Step 4: Change Word Wrap Settings
In addition to your Tab Settings, you can configure your Word Wrap Settings for the selected file type within the same dialog. The screenshot below shows these settings in the configuration dialog.
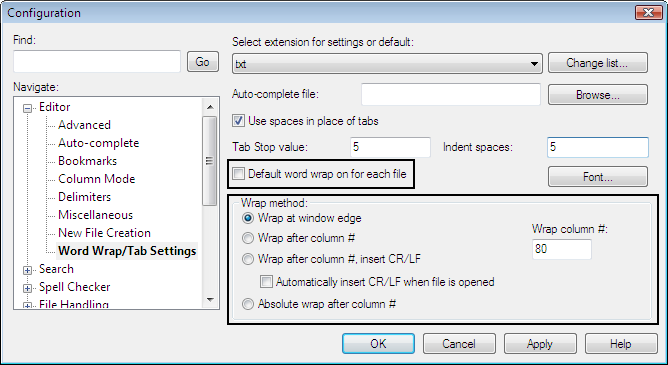
The following options are available to you for Word Wrap Settings:
Default Word Wrap On for Each File
Setting this will cause the editor to automatically enable Word Wrap when a file with the selected file extension is opened.
Wrap at Window Edge
Selecting this option for the wrap method will wrap the text of the file at the window’s edge without inserting a hard return. This would be for visual purposes only and would not change the content of the file whatsoever.
Wrap after column #
Selecting this option will wrap the text of the file at the specified column number without inserting a hard return. This would be for visual purposes only and would not change the content of the file whatsoever. The column number is specified in the “Wrap Column #” text field to the right.
Wrap after column #, insert CR/LF
Selecting this option will wrap the text of the file at the specified column number AND insert a hard return, which does make an actual change to the data in your file. The column number is specified in the “Wrap Column #” text field to the right.
Note: “CR/LF” means “Carriage Return/Line Feed” which is the same thing as a hard return.
Automatically insert CR/LF when file is opened
Setting this option will automatically insert a hard return at the specified column as soon as a file with the selected extension is opened. This will make changes to your file data.
Note: the above column wrap options will wrap on a word boundary. This may mean that the wrap does not occur on the specified column but on a lesser column number in order to preserve a word.
Absolute wrap after column #
Setting this option will automatically insert a hard return at EXACTLY the specified column. This is irrespective of word boundaries, so words will be broken up so the wrap occurs at the exact specified column number.

