IDM PowerTips
Configuring VCS with UEStudio
Important Note: This power tip is for users running UEStudio v10.30 and earlier. If you are running UEStudio v11 or greater, please see our v11 power tip on configuring VCS in UEStudio.
A Trademark feature of UEStudio is it’s powerful Version Control System. UEStudio does not provide a VCS server, however there are open source/free servers available for download/installation.
For those of you who have not heard of “Version Control”; Version control systems keep track of multiple versions of a source file. Version Control provides a great deal of power/flexibility to your backup strategy and is much more powerful than standard backups.
For the purposes of this powertip, we choose to use CVSNT which is a popular CVS server.
Note: If you already have a VCS Server running, you can skip to step 6.
Note: IDM Computer Solutions, Inc does not provide technical support for CVSNT or the installation of CVSNT on your system. This tutorial is intended as an introduction to configuring CVS on your system in use with the VCS functionality in UEStudio. For your convenience we are providing instructions for installing CVSNT if you don’t already have a VCS Server available.
Configuring VCS with UEStudio ’05
Step 1. Download the CVSNT File
You can download the install file from http://www.march-hare.com/cvspro/
Step 2. Install CVSNT
Run the installer from the file which you just downloaded. It is similar to a typical install Wizard however there is extensive information online regarding configuring CVSNT.
You will need to reboot your system after installing CVSNT.
If you need help installing CVSNT please see the following:
http://www.cvsnt.org/wiki/InstallationTips
For running the installer specifically:
http://www.cvsnt.org/wiki/InstallationTips#head-c196d557735a5620e861b991a497c9a2e924bd8e
Step 3. Create your repository
Create a directory on your system which will be your CVS Repository. You can do this using the command line (if you are familiar with this method) or through Explorer.
For the purpose of this tutorial we created a directory named cvsrepo in the C:\ drive (ie. c:\cvsrepo)
Step 4. Create your TEMP directory
Create a directory on your system which will be the location in which CVS ‘checks out’ files to for the purpose of editing/changing. You can do this using the command line (if you are familiar with this method) or through Explorer.
For the purpose of this tutorial we created a directory named cvstemp in the C:\ drive (ie. c:\cvstemp)
Step 5. Configuring CVSNT
Start the CVSNT Control Panel applet
Go to the Control Panel on your system and find the “CVS for NT” application.
Launch the application (double click)
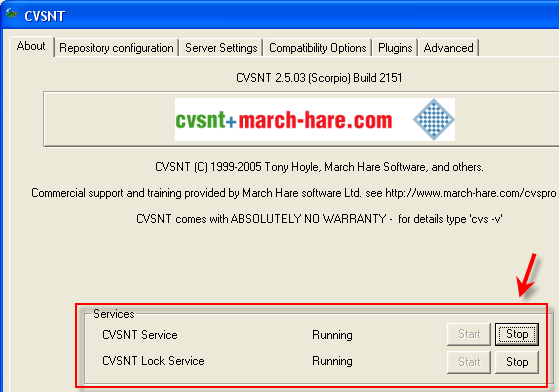
Make sure the service is not running
On the About Tab, make sure the CVSNT Service and the Lock Service are Stopped. If the Services running, the STOP button is enabled and you will need to click STOP for each. Conversely, if the Services are not running the START button will be enabled do NOT click start at this point.
Define your Repository
Click on the Repository Configuration tab. You will need to type the name of the repository server (if it is not listed by default). For the purposes of this tutorial, I will be using IDM20.
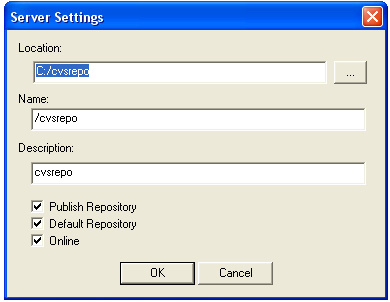
Click on the ADD button and fill in the appropriate fields:
Location: C:/cvsrepo
Name: /cvsrepo
Description: cvsrepo
We also checked all of the fields: Publish Repository, Default Repository, Online.
Additional information regarding defining your repository is available at http://www.cvsnt.org/wiki/InstallationTips#head-4d802aee8b175f5581ca832a7ae1d91c3b2c8225
Server Settings
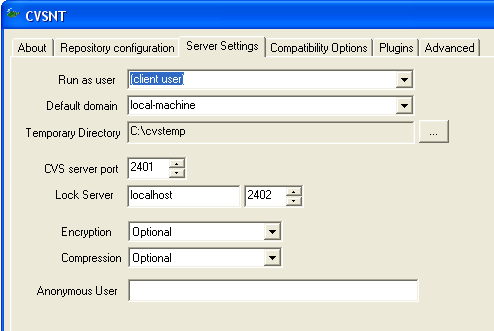
Click on the Server Settings. We used most of the default settings here, however there were a few changes.
We set the default Domain to the name of the local system (local-machine) and changed the temporary directory to the temp directory we previously created.
Apply settings
After you have configured CVSNT make sure to click APPLY. It is VERY important that you do this, or your settings will not be saved. After you have hit APPLY the apply button will be disabled.
Start the CVSNT Services
Go back to the About tab and click on START to start the services.
CVS Users
Accounts/Permissions are not covered in the scope of this tutorial, however additional information regarding “Adding CVS users” is available at http://www.cvsnt.org/wiki/InstallationTips#head-4d802aee8b175f5581ca832a7ae1d91c3b2c8225
CVS Help
If you are having trouble running/using CVSNT, please see the following page for FAQ/Troubleshooting information: http://www.cvsnt.org/wiki/Faq and http://www.cvsnt.org/wiki/InstallationTips for install/configuration tips.

Step 6. Create a Project
Open UEStudio from your desktop, Start Menu, etc.
Go to Project->New Project/Workspace->Create New Project.
Name and Save your project to your desired location. We named our project ‘cvs-dev’. You can obviously name your project whatever you choose.

Step 7. Project Settings dialog
After naming/saving your project, the project settings dialog will open. The project settings dialog is very powerful and has many configuration options. There is extensive information in the Help file regarding the project settings dialog so we will not go into further detail about this dialog here.
The main item we are interested in is the VCS Functionality. Click on the Settings tab and enable Version Control Support by clicking on the checkbox.
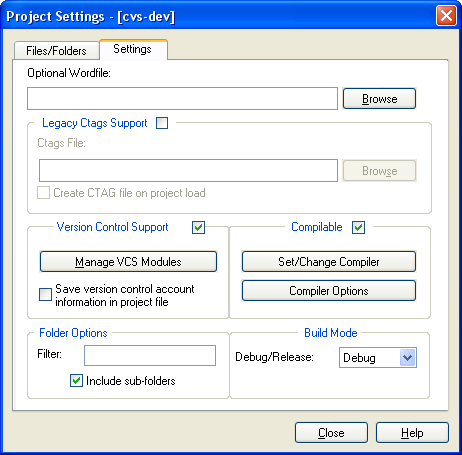
Step 8. Open the Version Control Module Manager
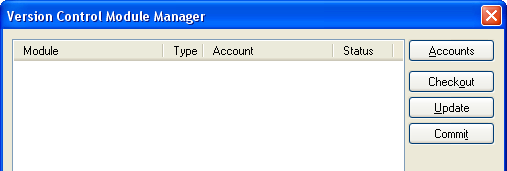
Open the Version Control Module Manager by clicking on the Manage VCS Modules button.
You should see the following dialog:
Click on the Accounts button in the Version Control Module Manager. You should see the Version Control Account Manager.
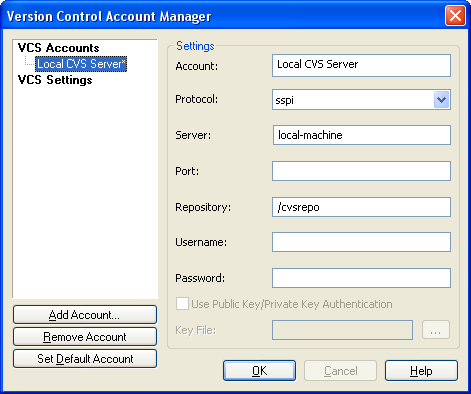
You will be taken back to the Version Control Account Manager in which you can now add the appropriate settings.
Set the Protocol
We used SSPI as the sspi protocol doesn’t require a login. SSPI instead uses the login from when you start your workstation.
For further information regarding security, protocols, authentication refer to the installation tips:http://www.cvsnt.org/wiki/InstallationTips
Set the Repository
Type the repository path. Do not type the FULLY qualified path. For instance, our repository is c:\cvsrepo. As you can see we typed ‘/cvsrepo’ for the repository path. If you type c:\cvsrepo it will not work.
It is important to note here that you NEVER want to check out files or manually add files to the c:\cvsrepo. This will cause you problems with the repository. If you would like to remove files/from the repository you may manually remove them.
Click on the VCS Settings (on the left) so you can add “c:\cvstemp” as the Default Checkout Root Path.
You can now click OK as you are finished configuring the account.
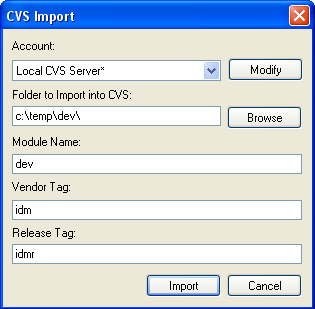
Vendor Tag
The Vendor Tag is the initial branch tag used to identify the module upon import.
Release Tag
The Release Tag allows for a unique identification of the files from this import into the CVS repository and for any subsequent imports.
Note: The only difference between the CVS Import dialog and the Subversion Import dialog is that the Subversion dialog does not include the Vendor Tag and Release Tag items.
Click on Import and the Module will be added to the Version Control Module Manager. You can check this by going to the Project Settings dialog->Settings Tab->and click on the Manage VCS Modules. You will see your module here.
Step 11. Checking out a Module
Now you are ready to edit the files so you need to checkout the module.
Go to Project->Version Control System->Checkout
You should see the module you added in the Module Dropdown. If not, click on the Update button.
For the purposes of this tutorial, our module included only one file. Your module will most likely have many more directories/files underneath it.

Step 12. Perform your edits/changes
Double click on a file to open it in UEStudio and perform your edits. After editing the file, you will see the icon has changed in the Workspace Manager.

Step 13. Commit your changes
After editing the file you need to commit your changes back to the CVS Server. The CVS server will then build/maintain the version record for the file.
The easiest way to commit your changes is to Right click on the file in the Workspace Manager. Go to VCS->Commit. You can also go to Project->Version Control System->Commit.
You will then be presented with the CVS Commit dialog. For further information regarding the CVS Commit dialog’s options, please see the help.
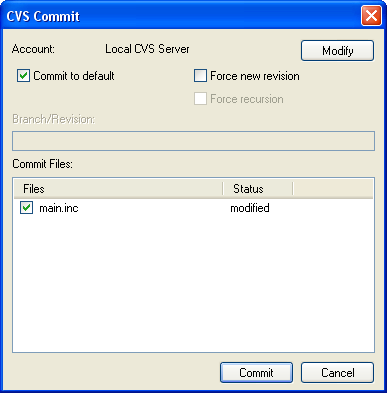
Depending on how you’ve configured your CVSNT Server, you may see the Log Editor prompt, you can click Save.
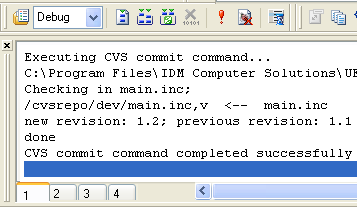
After you click save, the output window (within UEStudio) will show the actions taken.
As you can see the changes have been commited and the revision record has been updated.
