IDM PowerTips
Search for files in Windows by name with UltraFinder
Ever forgotten where you saved a file? Do you remember its name – or part of its name – but not its location? Let UltraFinder look for you! UltraFinder searches for files by full or partial name match – it’s the ultimate Windows search engine for your local drives, network, and even FTP servers!
1. Define find locations (where you want to search)
The first step to finding your files is specifying where to look. You may want to search a single folder or drive, or you may want to search multiple folders/drives.
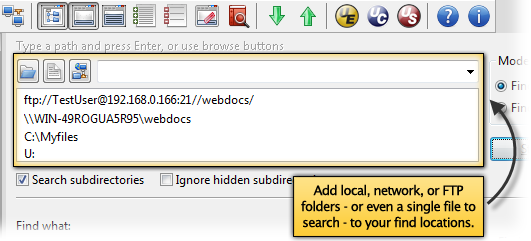
To add a folder or an entire drive to your search, either type in the path (for example, “C:”, or “C:\temp”) into the address bar and press enter, or click the blue folder icon to browse to and select the folder or drive.
Note: To search for files by name on an FTP site, please see the Search in FTP folders power tip.
There are two additional options beneath the Find locations list:
[ ] Search sudirectories
If checked, UltraFinder will perform a recursive search for files, descending into all subdirectories contained within your find locations.
[ ] Ignore hidden subdirectories
If checked, UltraFinder will not search for files in subdirectories that are hidden on your OS.
2. Specify full or partial file name
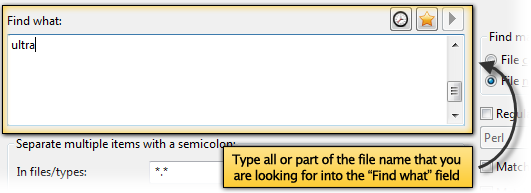
You can tell UltraFinder what file names to find by typing the full or partial file name in the Find What field.
3. Set filtering options
If you wish to filter your file name search to a specific file extension(s), you can specify this in the In files/types field. For example, if you wish to search for only Word documents, you would type *.doc;*docx.
You can also exclude subdirectories from your search to save time. To do this, type the folder name you wish to exclude into the Ignore subdirectories field. Any folders matching the name you provide here will not be searched. You can also provide a full folder path in this field.
Finally, you can also specify file names and types to ignore in the Ignore files/types field. For example, if you wanted to avoid returning any results with “log” in the file name, you could specify “*log*” here. This would filter out files named “blog.html”, “log.txt”, and “stats.log”.
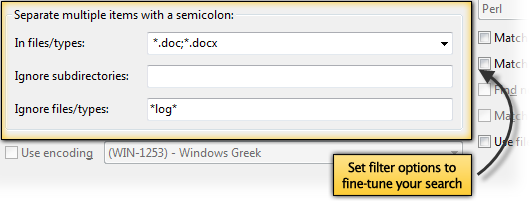
You can use a combination of the above to fine-tune your text searching. The more specific you make your filters, the less time it will take to execute the search!
4. Set find options
On the right side of the app, there are some additional find options that you can enable for finding files by name with UltraFinder.
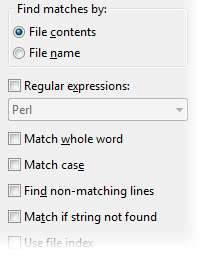
[ ] Find matches by File contents or File name
This controls whether you are searching for text in a file, or searching for text in a file name. For finding files by name, this should be set to File name. To see how to search for text in files, please see the Search and find text in files power tip.
[ ] Regular expressions
This allows you to use regular expressions in your find string. With regular expressions, you can find file names matching a pattern instead of a static string. You can learn more about UltraEdit and Unix style regular expressions here and Perl regular expressions here.
[ ] Match whole word
If checked, UltraFinder will only match a file if its name contains your search string as a whole word – that is, if it is enclosed in word boundaries (space, comma, period, etc.). For example, if your search string is “report”, then a file named “Campaign Results Report.docx” would be matched, while a file named “ResultsReport.docx” would not.
[ ] Match case
If checked, UltraFinder will search for file names using case sensitivity. This can be especially useful for Windows, where file names are not case sensitive.
[ ] Use file index
If checked, UltraFinder will use the native operating system file index for finding files by name. The benefit of this option is that your search will run in a fraction of the time that it would otherwise!
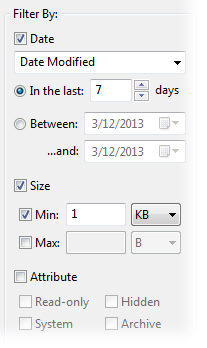
[ ] Filter by date modified/created
This setting allows you to restrict the search to a specific date range. For example, you may want to only search files that have been modified within the last 7 days.
[ ] Filter by size
This settings allows you to restrict the search to files within a specified size range.
[ ] Filter by attribute
This settings allows you to restrict the search to files with specific attributes.
5. Execute search and examine results
After setting up your file name search, click Start. The search will complete, and you will see the results written to the results window.
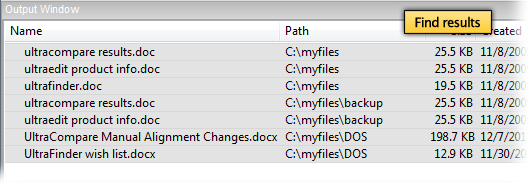
In the results tab of the output window, UltraFinder will show each file matching your search string. You can sort your results by clicking on the column headers. For example, clicking on the Size column header will sort the files from smallest to largest. Clicking Size a second time will sort the files from largest to smallest.
You can double-click a file or line result to open that file in its associated application. You can also compare files from the results window by selecting one or more files, right-clicking them, and selecting Load in UltraCompare. To open one of the results in UltraEdit, right-click and select Open selected in UltraEdit.
Finally, you can right-click on the results to copy them in any variety of ways to the clipboard or open them as a new file in UltraEdit!

