Edit, Run, and Debug your SAS Programs in UltraEdit
IDM PowerTips
The following power tip was provided by an UltraEdit user for the benefit of other UltraEdit/UEStudio users who wish to use UltraEdit as a SAS Editor, as well as run and debug SAS programs from the editor itself. IDM does not support SAS and therefore cannot support any SAS-related issues that may arise from following the steps described in this power tip.
User-submitted power tip by Keith Adams, January 2011. Author’s note: Intended audience – intended for heavy- duty SAS coders using (or considering using) the super-advanced text-editor UltraEdit.
You can download a PDF version of this power tip which includes all of the files needed, and also includes a section explaining why this tip is so useful.
Develop, Run, and Debug your SAS Programs in UltraEdit
In this tip, I demonstrate how (and provide templates to make it easy for you) to run any SAS program (always your current active file) directly from UltraEdit with the click of a button on the toolbar. You can optionally also run an UltraEdit macro which not only runs the program, but also loads the log file automatically, after execution. (But, unfortunately, macros can’t be run from the Toolbar.)
In brief, this trick uses a DOS batch-file, run from an UltraEdit Tool (user configured), triggered by a click on the Toolbar. The UltraEdit tool may also be run from an UltraEdit macro (which then opens the log file, once the program has executed.)

Batch File
You will have to tailor the batch file to your own environment. Typically, you’ll be using a specific autoexec and config file, and some other environment settings, so your batch file may be different from mine. Mine looks like this, and a template for your own is here (important: please create yours by copy and paste from this linked page, rather than download that page, since it’s an html page):
set CONFIGSAS=C:\Program Files\SAS\SASFoundation\9.2(32-bit)\nls\en\SASV9.CFG
set AUTOEXECSAS=C:\_Current Projects\CXA\DIScustProfileEnv\code\autoexec.sas
Set EXESAS=C:\Program Files\SAS\SASFoundation\9.2(32-bit)\sas.exe
"%EXESAS%" ^
-CONFIG "%CONFIGSAS%" ^
-autoexec "%AUTOEXECSAS%" ^
-sysin %1 -log %2 –nodms
Note that you need to leave the final line as is for this to work. UltraEdit will send those parameters to the batch file. The program name will be the name of the active file in UltraEdit, and it’s assumed the log file will be the same, except “.log” in the same location (however, you can modify this behavior fairly simply, if, for example, you want all of your logs in the same location.)
IMPORTANT: You can put this batch file wherever you want. You’ll specify that location when you configure the UltraEdit Tool. HOWEVER, there can be no whitespace in either the path or the batch file name.
This is optional, if you want to be able to click on the menu to run your current program as a SAS program. You’ll need a menu icon. Here’s what I use. You can download it to the location on your disk you want to keep it (you’ll need the name and path for the tool configuration.)
These are defined from the Advanced/Tool Configuration menu choice, and are typically command-line calls to DOS or Windows programs, optionally passing parameters such as active file-name.
Quick Way: If you don’t have any UltraEdit tools already configured (if you don’t know what I mean by this then you don’t have any!), you could just replace the [Tools] section of your .ini with the text in this sample tool settings text file. You can find your .ini file by selecting the Advanced menu, then “Configuration/Application Layout/Advanced”, as shown below.
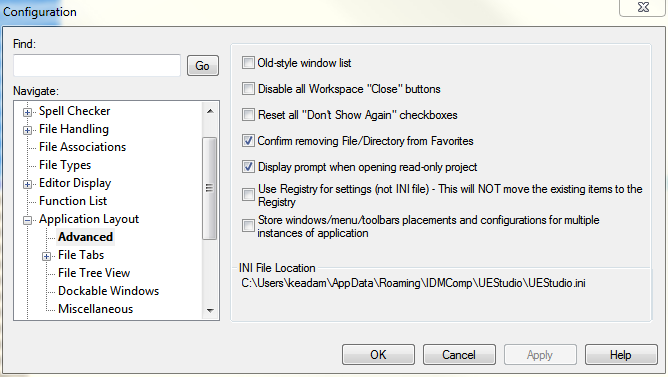
Edit the file you find in this location, find ‘[TOOLS]’ and replace the entire section with the text in this file.
Once you’ve done this, bring up the Tool in UltraEdit (you may have to restart) by “Advanced/Tool Configuration”, and make sure everything is correct (see screen snapshots below) and edited to fit your situation (e.g. path/name of batch file, path/name of bitmap for menu item etc.)
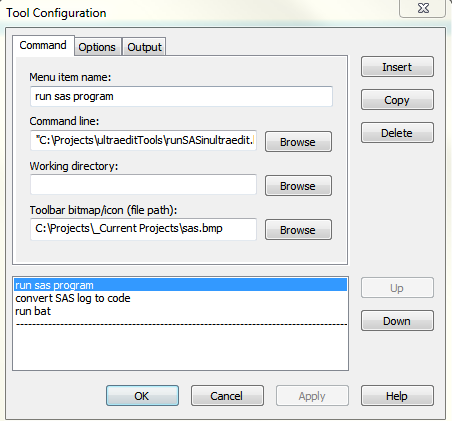
Manual Way (and Reference for Finalizing via Quick Way): There’s no way to export a single tool configuration, so here are the steps to do it manually. Open the Tool Configuration dialog box using “Advanced/Tool Configuration”. Fill in the first tab something like the diagram below (in The “Command” Tab section), making sure to use your own paths etc., then click the Insert button. You will then fill in the other two tabs, then click the Ok button.
Important: My example shows multiple tool configurations – you will not see the extra definitions at the bottom of the first screen.
The “Command” tab
Command-Line:
Put the correct path and name for your batch file in quotes, followed by a space, and then: “%f” “%p%n.log” (using quotes as shown.) The %f passes the name of the active file to the batch file, and the %p%n.log constructs the name of the log file from the path and the first part of the filename. If you wanted, for instance, to put your log file somewhere else, just substitute your path for %p, making sure to include the ending slash.
Toolbar bitmap/icon (file path):
Put the path and name of the .bmp file you want to use as a toolbar icon. This is optional.
The “Options” Tab
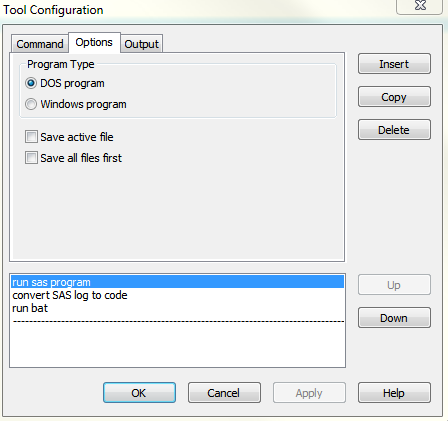
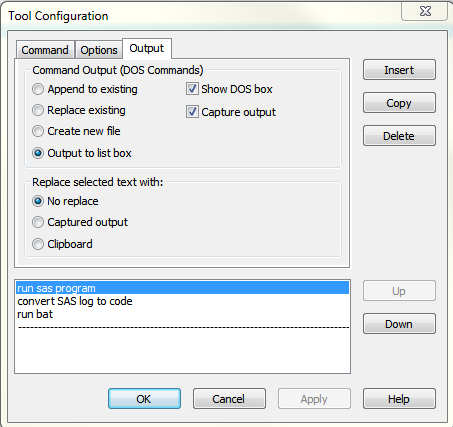
Complete the options tab, as shown below.
The “Options” Tab
Complete the options tab, as shown below.
(Optional) Put Tool on the Toolbar
This is optional. You can run the tool from the toolbar – it will run your active file (presumably a SAS program!) using your batch file, creating the log as defined. Follow the instructions below (the screen snapshot of my own toolbar customizations dialog is for reference, with the appropriate sections highlighted by a yellow box.)
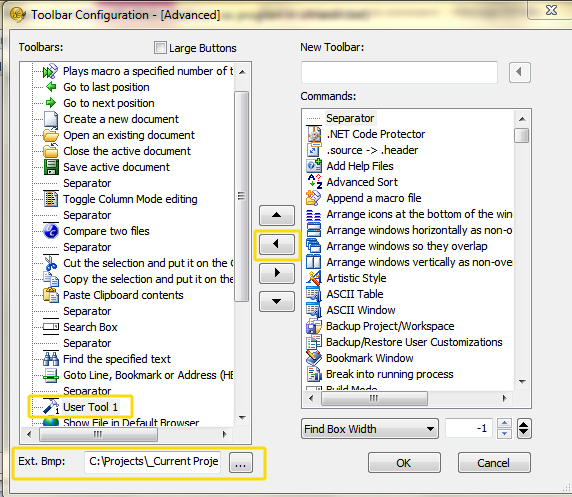
- Right-click the little “customize” icon (a tiny down arrow bottom right) on one of the UltraEdit toolbars, and select “Customize toolbar…”.
- In the right-hand side of the screen, find “User Tool 1” almost all the way to the bottom, select it, then click the little left-arrow icon in the middle of the panel to move it across to your toolbar.
- Select it now on the left-hand side, and in the “Ext.bmp” box at the bottom left, use the “…” button to browse to the bitmap file you’re using as the toolbar icon (see earlier step in this document.)
- Click “Ok” to save the customizations.
This is optional. You can install an UltraEdit macro which runs the configured tool, then automatically opens the log file (this will only work if the log file is in the same location as the SAS program, and is the same name except for the “.log” extension.) You can assign a keystroke to it, then you would be able to both run the active file in SAS and auto-load (or reload) the associated log-file.
Download UltraEdit Macro File
To install the macro, you will first need to download the .mac file to a location of your choice.
Set Macro Autoload File
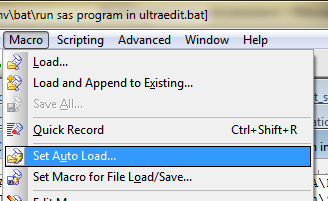
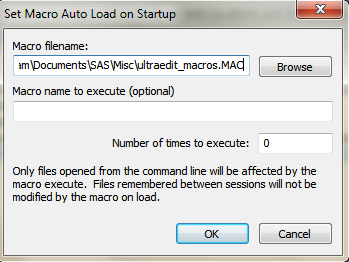
You will then tell UltraEdit to auto-load this file, as shown in the screen snapshots below, by browsing to the file you just saved in order to fill the “Macro Filename” box shown in the second screen snapshot.
Confirm Macro is Loaded, and Define Hotkey
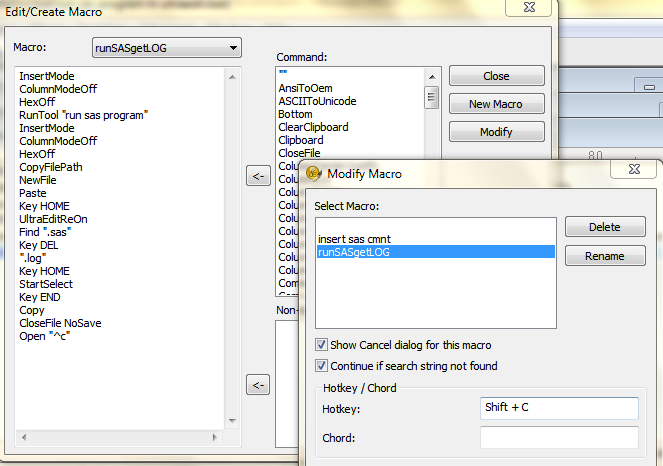
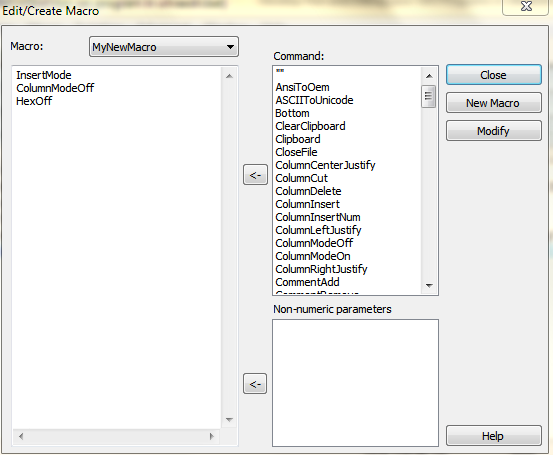
UltraEdit won’t actually load the macro when you set auto-load. Click the “Macro” menu once again, and choose “Load…”, and browse to the .MAC file, and click “Ok”. Then, click “Macro/Edit Macro…”, and you should see what’s shown below. In the “Macro” drop down you’ll first have to select the macro shown in the screen snapshot. If you get this, then you can click the “Modify” button, and select a hotkey by positioning the cursor in the Hotkey box, then pressing the desired key combination.
Cannot Load Macro
If you can’t define the macro this way, then define it manually. Click the “Macro” menu, and then the “New Macro” button, and you’ll get the dialog below, into which you enter a name for your macro, and, optionally, choose a Hotkey.
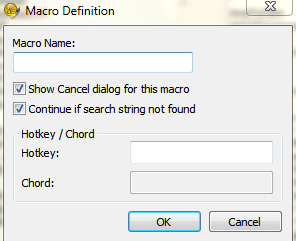
When you click “OK”, you’ll see something like the following screen, below. Position the cursor underneath the “HexOff” line (if you have one – don’t worry if you don’t), and cut-and-paste the text from this file into the box, then click Ok, and your macro will be defined.
Finally…
You should now have:
Configured Tool – You should now have a configured tool called “run sas program” which will appear at the bottom of the UltraEdit “Advanced” menu.
How to run the Tool – You can run the tool either from the little SAS icon on your toolbar (if you followed that part of the instructions), or through the “Advanced” menu choice as shown above. Either action will run your currently active file as a SAS program using the batch file you created, and create the log file.
Both running the Tool and Loading/Reloading the Log – If you followed the instructions, you defined a macro to both run the tool and load the log file, which you can execute from a hotkey.
Author’s full disclosure: this is the first version both of the various components as well as this document. There are undoubtedly either or both of bugs in the components, and errors and misstatements in this document! If you find them, please contact me at keith[dot]adams[at]sas[dot]com.

