IDM PowerTips
Configuring version control systems with UEStudio (v11 and greater)
Important Note: This power tip is for users running UEStudio v11 and later. If you are using an earlier version of UEStudio, please see our legacy power tip on configuring VCS in UEStudio.
UEStudio includes support for version control systems; specifically CVS and Subversion, two of the most popular version control systems among developers. While UEStudio does not act as nor provide a server, it does provide client functionality for accessing CVS/Subversion repositories to update, check out, add, modify, and commit files to the server.
Note: If you already have files and folders checked out from a CVS or Subversion repository on your system, and you wish to add these to a UEStudio project, you do not need to manually set up your CVS or Subversion account information. Instead, add these files/folders to a new project in UEStudio and let UEStudio’s version control auto-detect feature do all the work for you! Otherwise, proceed with the steps below.
Step 1. Download the CVS or Subversion client binaries
As of UEStudio 11, the files required for version control functionality are no longer included as part of the installation. However, you can download the client binaries at no additional charge via the following links:
Subversion client binaries
- UEStudio v14.00 and later: http://subversion.apache.org/packages.html#windows
CVS client binaries
CVS client binaries are not directly available from IDM. You can find third party CVS client libraries for Windows on the Internet.
If you downloaded one of the supported binaries in the zip file from our download server above, all you need to do is open the zip file and extract the client binary to a permanent location on your system. You may wish to use the UEStudio installation directory, or if you do not have sufficient permissions, you could use your “Documents” directory. The location doesn’t necessarily matter; you only need to ensure that UEStudio is correctly configured (step 3) to look in whichever location you choose.
If you downloaded a client from the third-party site, you will now need to run the setup program as with any third-party program to install the CVS or Subversion client on your system.
Step 3. Configure version control paths in UEStudio
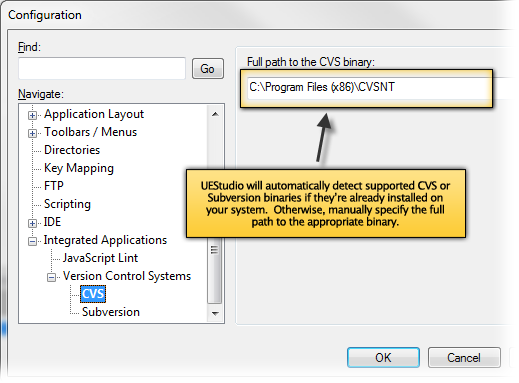
Now that the CVS/Subversion client is on your system, you need to specify the correct paths to the binary file in UEStudio’s configuration. Open UEStudio and go to Advanced -> Configuration -> Integrated Applications -> Version Control Systems.
For Subversion
Set this to the binary directory within the Subversion installation, usually the “bin” folder.
For CVS
Set this to the directory containing the “cvs.exe” file within the folder you extracted to your system from the download link above.

Step 4. Configure your CVS or Subversion account
If you do not already have files/folders checked out from a repository externally to UEStudio, you’ll need to manually set up your CVS or Subversion account configuration. To do this, go to Project -> Version Control Systems -> Accounts/Settings.
Click “Add Account” and specify whether you’re using CVS or Subversion, then provide a name for the account. (This isn’t the server name but a generic name you can use for your checked-out project.)
You will now need to specify the following account settings:
Protocol
You should already have this information from the Subversion/CVS server administrator or documentation for your project. You must specify the correct protocol in order for UEStudio to be able to connect to the server.
Server
Either the host name or IP address of the Subversion or CVS server.
Port (Optional)
If required, specify the port for server connectivity here.
Repository
Specify the path to the repository on the server.
Username
Type in your user name (or leave empty if you’re checking out anonymously).
Password
Type in your password.
Click Apply and OK to save your account settings.
Step 5. Create a project to hold your checked-out files
Now you’re ready to check out files. You’ll need to create a project first, which acts as a virtual “container” for your checked-out files and folders. See our project power tip for further information how to create and configure a project – it’s easy!
Once your project is created, go to Project -> Version Control System -> Checkout. Connect to your server, then select the folder or module you wish to check out.
You will now see your checked-out folder in the Project tab of the Workspace Manager, indicating that your locally checked-out folders and files are now a part of your UEStudio project.
You are done
That’s it! You’ve successfully configured UEStudio to open, modify, and commit files from your CVS or Subversion server. Right-click your files in the Project tab of the Workspace Manager for commit, update, and other version control operations. You’ll see progress logs written to UEStudio’s output window.

