Getting started with Git in UEStudio
Git is quickly becoming one of the world’s most popular solutions for version control. Many popular projects are only available through Git hosts, and many teams are beginning to appreciate the value of the distributed nature of Git.
This power tip focuses on integrating Git into your UEStudio workflow and assumes you have a basic understanding of how Git works. If you are not yet familiar with Git, take a few moments to read the documentation first – the information here is easily digestible, even for beginners, and well organized.
Note: Git support was added to UEStudio v15.0.
Learn more about UEStudio/UltraCompare Git Workspace.
1) Configuring UEStudio to use Git
If Git is already installed on your system
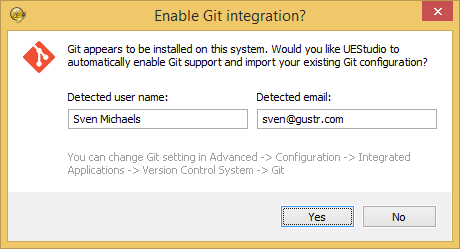
UEStudio will attempt to detect an existing Git installation on first run. You should see the dialog shown below. Simply confirm your settings and press OK; UEStudio is now ready to use Git.
If Git is not already installed on your system, or if UEStudio fails to detect Git
If Git is not already installed on your system, download Git for Windows here and install it, accepting all installation defaults.
After the installation is complete, go to Advanced -> Configuration -> Integrated Applications -> Version Control Systems -> Git and check “Enable Git Integration“. Provide the full path to the Git installation’s “bin” directory, which is normally “C:\Users\%USERNAME%\AppData\Local\Programs\Git”.
These configuration options also also allow you to set UEStudio as the default Git editor, as well as UltraCompare as the default Git difftool/mergetool.
2) Interacting with repositories
If you don’t yet actually have a repository, creating a new one or cloning an existing one is easy! To create a new repository, simply right-click on an existing folder and select Git -> Create/initialize repository here.
To clone an existing repository (this is what you do if you want to pull in a project from sites like GitHub or Gitorious), again right-click on an existing folder and select Git -> Clone repository…. In the “Clone repository” dialog, paste in the URL or file path to the existing repository. For remote cloning, HTTP, HTTPS, and SSH protocols are all supported.
3) Creating or cloning a new repository
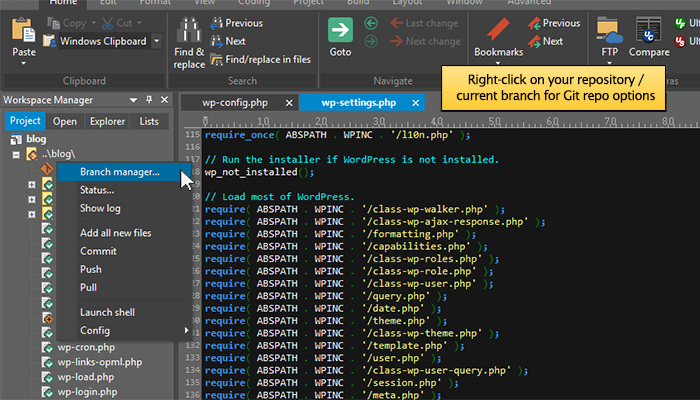
Now that Git is enabled in UEStudio, you can begin interacting with any existing repositories on your system. To see this, simply browse to them in the Workspace Manager (if you don’t see the Workspace Manager, press Ctrl + U).
You can add Git repositories to your active project, but you don’t have to. UEStudio will show your repository info for folders in both the Project and Explorer tabs of the Workspace Manager.
To do things with your repository, right-click on the repository folder or on the current branch indicator. The context menu provides you access to the most commonly used Git functionality.

4) Committing changes and working with modified files
If you’ve changed any file(s) in your Git repository, UEStudio will show you this with the orange icon overlay in the Workspace Manager. Committing them is easy: right-click on the repository folder or current branch and select the Git -> Commit option. You can also commit just a single file by right-clicking on that file and selecting Git -> Commit this file only.
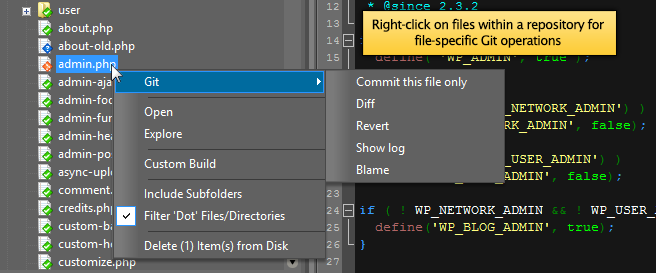
If you want to undo the changes you’ve made to a file, you can right-click on the file and select Git -> Revert. This will restore the last-committed version of the file.
Use UltraCompare to see what changes you’ve made
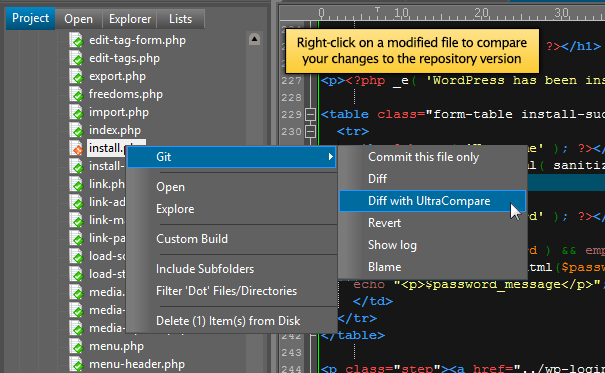
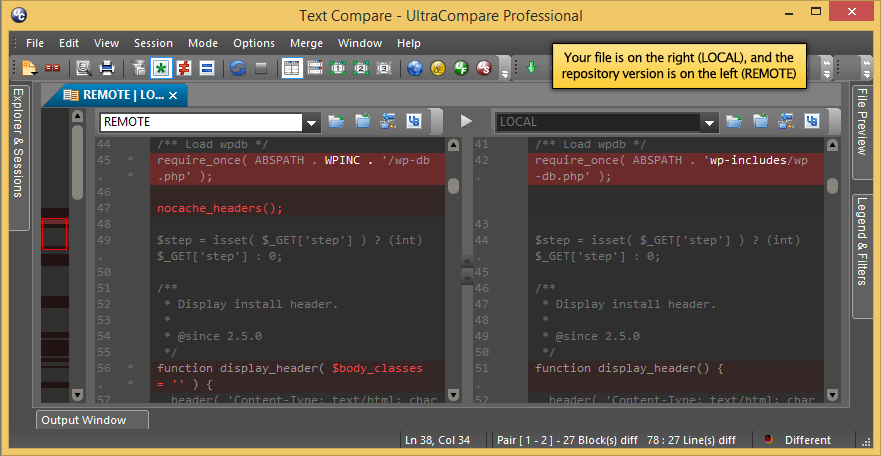
If you have UltraCompare, you can use it to quickly review the changes you’ve made to a file. To do this, first go to Advanced -> Configuration -> Integrated Applications -> Version Control Systems -> Git and check “Set UltraCompare as diff/merge tool for all repositories.” You can then right-click on modified files and select Git -> Diff with UltraCompare to check you changes against the last committed version.
5) Managing branches
Git’s branching functionality is one of its most extraordinary features. If you want to truly leverage the power of Git, you need to understand how to manage branches.
UEStudio makes managing branches easy with the Branch Manager. To bring up the Branch Manager, double-click the current branch indicator. You can also go to View -> Views/Lists -> Git -> Git Branch Manager, or you can toggle it with its keyboard shortcut.

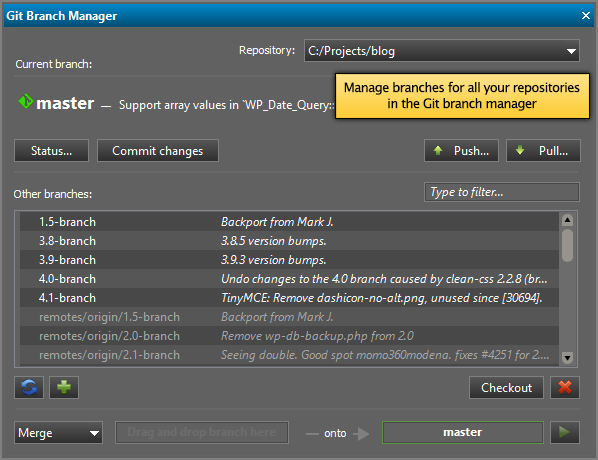
Here in the Branch Manager, you can:
- Checkout / create / delete branches
- Commit all changes
- Merge and rebase branches
- Filter and search branches
- Add / remove remote references
- Pull from / push to remote
- See which branches are merged into active branch (indicated via check mark next to branch name)
Merging branches
With Git, you merge by first checking out the branch you want to merge onto. You can checkout a branch by double-clicking it in the branch manager.
To merge a different branch onto the current branch, simply drag and drop it onto the drag-and-drop area at the bottom of the Branch Manager dialog. Click the green “Play” button to execute the merge.

6) Using the Git shell
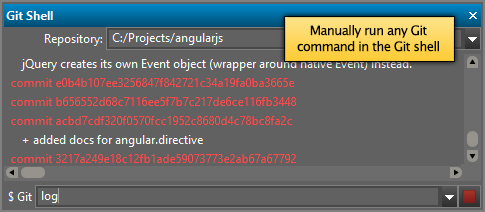
Most of everything you’ll need to do with Git is available directly within UEStudio. However, there may be a time when you need to run a special or advanced command on your Git repository. UEStudio makes this possible with the Git Shell. You can show this window via View -> Views/Lists -> Git -> Git Shell, or you can toggle it with its keyboard shortcut.
The Git Shell should be shown by default if you’re using Git. In fact, every time you interact with your Git repository, UEStudio runs a Git command in the background. You can see the commands in the Git Shell as UEStudio is issuing them, along with any output from Git.
To issue a command in the Git Shell, first make sure the correct repository is selected at the top of the window. Then simply type the command you want to issue at the bottom of the shell and press Enter. If the command is taking too long or appears to be “hung”, you can click the red “Stop” button to kill it.
7) Power up with Git keyboard shortcuts
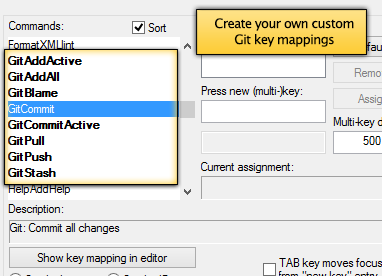
Bringing up menus to issue Git commands is somewhat cumbersome and can interrupt your workflow. If you’re in the middle of a fruitful coding session and you need to do a commit, you don’t want to go find your repository folder, right-click on it, and then find the command to commit. That’s why UEStudio includes several key mappings for the most commonly used Git commands…so you can quickly do whatever Git action you need without skipping a beat. Currently the following commands are supported, and you can change these to suit your preferences in Advanced -> Configuration -> Key Mapping:
- GitAddActive – Ctrl + Shift + N – Add active file to repository
- GitAddAll – Ctrl + Shift + M – Add all new files to repository
- GitBlame – Ctrl + Shift + B – Open file with blame output for active file
- GitCommit – Ctrl + Shift + K – Commit all modifications to repository
- GitCommitActive – Ctrl + Shift + J – Commit active file only to repository
- GitPull – Ctrl + Alt + Down Arrow – Pull active file’s repository from remote
- GitPush – Ctrl + Alt + Up Arrow – Push active file’s repository to remote
- GitStash – Ctrl + Shift + T – Stash all changes in active file’s repository
- ViewGitBranchManager – Ctrl + Shift + H – Show/hide Branch Manager
- ViewGitShell – Ctrl + Shift + H – Show/hide Git Shell
8) Frequently Asked Questions
Q: Is it possible to use a public/private key pair for managing Git remotes via SSH in UEStudio?
Yes! In order to do this, however, you need to make sure that your public key is uploaded to the proper location on the server. You also need to make sure your private key is in the expected location for SSH – on Windows, this is usually “C:\Users\[Your-User-Name]\.ssh“.
Furthermore, you need to make sure that you’ve specified the key location for the server you’re connecting to. You may see an error message like “Permission denied (publickey). Fatal: Could not read from remote repository. Please make sure you have the correct access rights and the repository exists.” If you see this error message, it’s probably occurring because Windows doesn’t know where your private key is, or the private key doesn’t have the name Windows expects (“id_rsa”).
You can remedy this by creating a file named “config” in your C:\Users\[Your-User-Name]\.ssh\ directory which contains the path to the private key via the “IdentityFile” setting. For example, if you create a public/private key for GitHub to be able to interact with GitHub repos via SSH, this key will typically be named “github_rsa” which Windows will not recognize as your private key. To fix this, you would need to create the C:\Users\[Your-User-Name]\.ssh\config file and add the following to it:
host github.com
  hostname github.com
  identityfile ~/.ssh/github_rsa
Q: What do the Git overlay symbols mean?
These symbols tell you the following:


