IDM PowerTips
Group Files and Folders with Projects
Why use a project? Projects are a convenient, time-saving, feature that allow you to group and manage associated files. Additionally, Projects are integrated throughout the framework of UltraEdit making it easier to perform other actions on your project files such as replace in all project files.
The purpose of this Power Tip is not to provide you with an exhaustive summary of all that projects can do for you; rather, we will demonstrate the basic functionality of projects – creating a project, adding/removing files, and accessing project files.
Create a project
To create your project, simply go to the project menu and select New Project/Workspace.
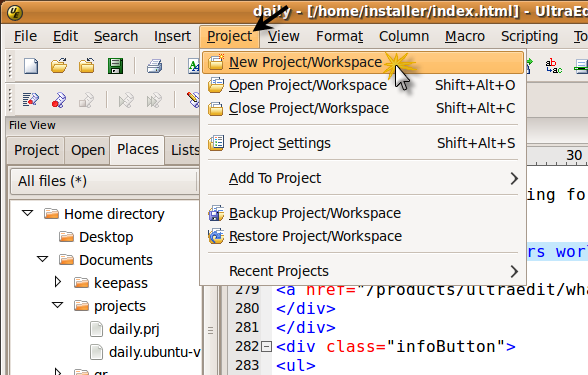
You should see the Create a Project dialog, type the name of the project and click save. For the purposes of this Power Tip, we are calling our project “daily”
After naming your project, you will see the Project Settings dialog, which brings us to adding files to a project.

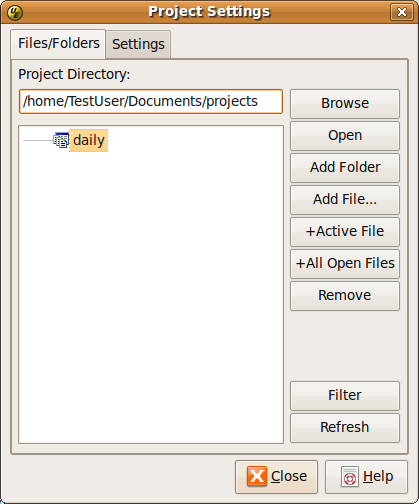
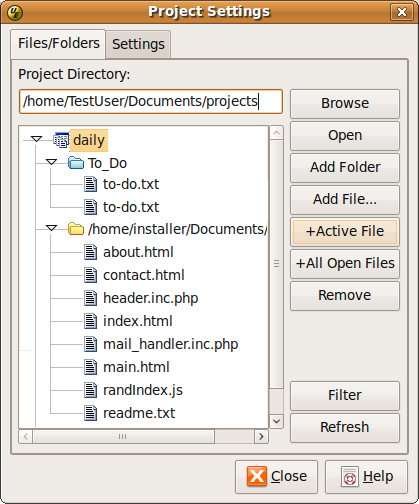
The project setting dialog is opened automatically when you create a project, but you can also access it via the project menu. Below is a screenshot of the project settings dialog that shows our new project – daily.
Add a file
To add a file, click on the Add File button. You will see a standard windows open dialog. To select multiple files, hold the CTRL or SHIFT key while you click on the items you wish to add.
Add a folder – Group
A Group is different from a standard directory on the file system in that the Group is a logical grouping only. In other words, there is not a specific directory on the file system that corresponds to the folder you are adding, the group simply allows you to place your associated files in a “folder” without moving the actual file in the file system. So, if you had 2 files such as c:\myfiles\work\to-do.txt and c:\myfiles\home\to-do.txt, you could create a group called “To-Do” and add both files to the group. Each file would remain in it’s place on the file system, but your project would contain both files in the “To-Do” group.
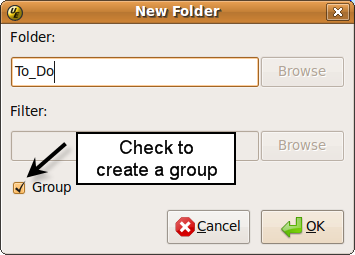
To add a Group, click on the Add Folder button. You will then see the New Folder dialog. By default the “Group” button is checked. Type the name of the group, in our case we typed “To-Do”, then click OK. To add a file to the group, click once on the Group so it is highlighted (active), then click Add File. The file will be automatically added to the group.
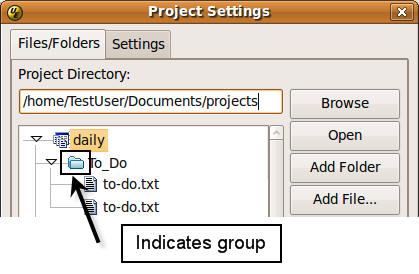
Note: You can easily identify the “Groups” by the folder color. Groups are Blue whereas the Directories are yellow.
Add a folder – Directory
A directory is a folder/directory that actually exists in the file system. To add a directory, click the Add Folder button and un-check the Group box in the New Folder dialog, you can then click the Browse button to browse to the location of the directory on the file system.
Please see the Help file for further information about the additional options/features in the Project Settings dialog.
Active Files
Finally, if you wish to open the files open in the editor (Active Files), you can do so using the +Active File and +All Open Files. The +Active File will add the single file that is active in the editor. The +All Open Files will add all files that are currently open.
Project Tab in File View
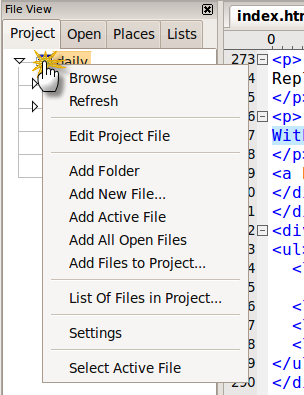
If you are looking for a quick method to add files/folders to the project, and don’t want to pull-up the project settings dialog, you can also use the right-click context menu in the Project tab (in the File View) to add files/folders to your project.
If it is not already open, open the File View in the View : Views/Lists submenu. You should see your project name at the top of the project tab, right-click on the project name and choose the desired option.
Remove Files from a project
Removing files from the project can be done through the Project Settings dialog or from the right-click context menu in the Project Tab (in the File View).
Note: When removing a directory from the project, you must select the top-level directory. This is the directory you initially selected and added to the project. If you try to remove sub-directories from the project, and not the top-level directory, the remove option will ask you if you wish to delete the file from disk rather than removing it from the project.
Viewing/Opening project files
You can open project files from the project settings dialog or from the project tab directly. The project settings dialog can be accessed from the Project menu, and the File View can be accessed in the View : Views/Lists submenu.
To open the files, select the desired file(s) you wish to open and click on the open item. You can select multiple files by holding SHIFT and CTRL as you click on the files.

