Writing a powerful macro
The easiest way to write a macro is not to write it from scratch but to let UltraEdit do most of the work for you. One of UltraEdit’s trademark features is the ability to use powerful macros.
The macro menu includes a feature called quick record which can write most of your macro for you if you understand how it works. The quick record function records what you are doing until you tell it to stop.
When writing a macro, using quickrecord, the idea is to manipulate the text/data as much as possible using the keyboard, UltraEdit’s native functions, Templates, and even other macros so quickrecord can record your steps. After you stop quickrecord, you can then go back and edit the macro by hand.
For instance, you can go back through your macros and add loops, conditional statments, regular expressions, etc.
We have used this method MANY times in creating very complex macros which have saved us hours and hours of work. It’s just another example of the power of UltraEdit!
Lets begin…
Writing a Macro
For the following example, we will take a pipe delimited data file (containing mailing addresses) and format the addresses into a standard format. Furthermore, we want the macro to run through the entire file, formatting each record.
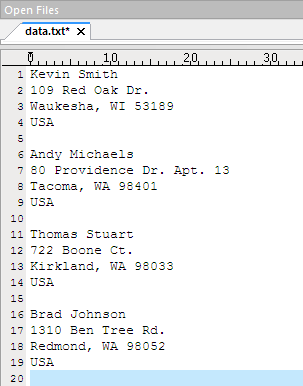
The sample file which we are using looks like this:

We understand that this may not be the exact macro you are looking to create, but pay attention to the methods used to create your own macro.
1. Assess the ‘problem’
Open the data file and first think through what you are starting with and what you need to end up with.
It’s easiest to take a single record and determine what needs to be done with it, and worry about repeating the macro later.
For our example, this is what we are starting with:
Kevin Smith|109 Red Oak Dr.|Waukesha|WI|53189|USA
and this is what we would like to end up:
Kevin Smith
109 Red Oak Dr.
Waukesha, WI 53189
USA
2. ‘Dry run’
Step through how you will format the data using only the keyboard.
Keep in mind, if you are planning on using loops (covered later) you will want to think through how you are incrementing to satisfy the loop condition.
You don’t necessarily need to do this, but we always suggest running through the steps one time before using the quick record to make sure you know how to use only the keyboard and menu functions get the results you need.
3. Quick Record
Go to Macro : Quick Record (CTRL SHIFT R)
4. Step through formatting your data as desired
For the above example, we did a Find for “|”. This placed our cursor at the pipe symbol every time we hit F3 (Find Next).
Then, I hit ENTER, SPACEBAR, and ‘,’ where appropriate to format the data as needed and ended with this:

5. Stop Quick Record
Now that the single record is formatted as desired, stop quick recording in the Macro menu.
6. Edit the macro
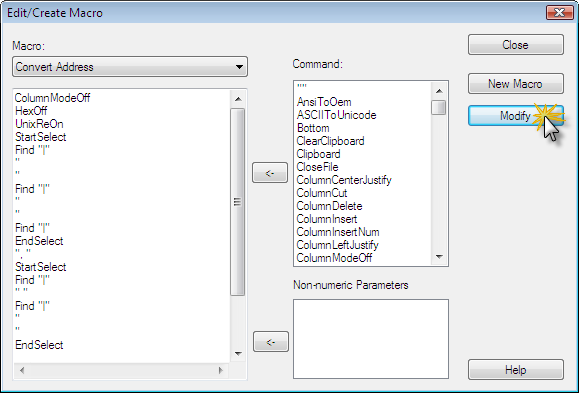
To edit the macro you’ve recorded, go to Macro : Edit Macro. You will then see the Edit/Create Macro dialog.
Modify the Macro properties
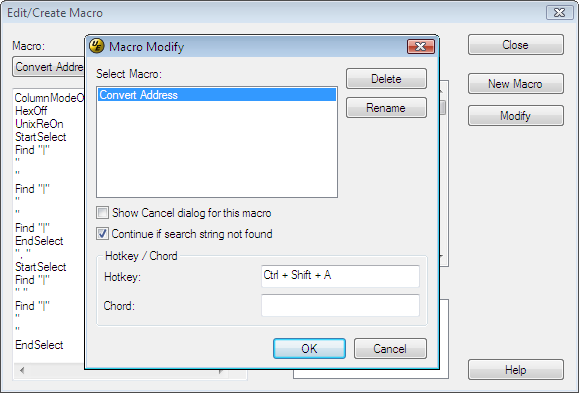
I like to start by naming the macro, and assigning it a Hot Key. Click on the “Modify” button on the edit macro dialog.
The “Modify Macro” dialog will open and allow you to rename the macro and assign a Hot Key:
Editing the macro
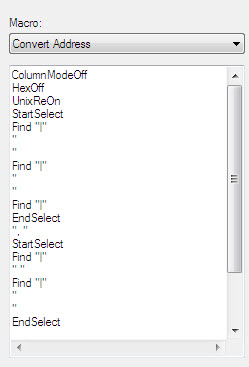
Depending on what you want the macro to do, there are many functions listed in the command section. You can move them over using the arrow or type them in by hand. For further information regarding the functionality of the commands available please see the help.
You will do your editing, as you may have guessed, in the text area:
For our example, we want to run through the entire file and format each record. This is known as a loop.
Loop the macro
This is where some programming experience comes in handy as you can add loops, conditional statements, etc. Loops and conditional statements are not covered in the scope of this powertip as it assumes some prior knowledge of this.
Keep in mind, not every macro will require loops; however for our example we will use a loop to run through all of the data until the end of the file.
The idea of the loop is to continue doing some action(s) until a condition is satisfied, at which point the loop will stop. When using a loop, you MUST ensure that the condition will be satisfied in order to stop the loop, otherwise the loop will run indefinitely.
For our example the loop condition to be satisfied is the end of the file. The basic logic of the loop is: ‘if the cursor is at the end of the file, exit the loop; otherwise, keep running these steps’. ie:
Loop
IfEof
ExitMacro
Else
Action(s)
EndLoop
When recording my keyboard actions, after running through all of our formatting, we intentionally placed the cursor at the beginning of the next line. We are therefore ‘incrementing’ the position of the cursor so with each loop, we are moving the cursor towards the end of the file. If we didn’t do this, the loop would spin indefinitely on the first record creating an ‘infinite loop’.
Now, where to place the loop to do the appropriate actions. In the edit macro dialog, our macro looks like this:
ColumnModeOff
Find “|”
Key “RETURN”
Find “|”
Key “RETURN”
Find “|”
“, “
Find “|”
” “
Key “RETURN”
Find “|”
Key “RETURN”
Key “END”
Key “RETURN”
Key “DOWNARROW”
The main action we want accomplished is the code below “ColumnModeOff”. So we edited our macro to look like this:
ColumnModeOff
Loop
IfEof
ExitMacro
Else
Find “|”
Key “RETURN”
Find “|”
Key “RETURN”
Find “|”
“, “
Find “|”
” “
Key “RETURN”
Find “|”
Key “RETURN”
Key “END”
Key “RETURN”
Key “DOWNARROW”
EndIf
EndLoop
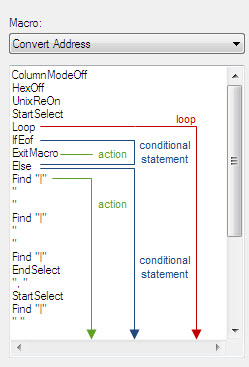
To help you understand where the loop/conditional statements flow, please see the following:
7. Save macro
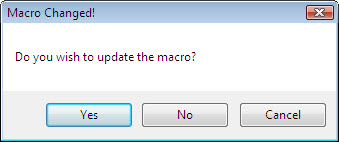
To save the macro you have created you can either switch to a different Macro (in the drop down) or close the macro. You will then be prompted to update the macro. Answer ‘yes’. This will update the macro and then return you to the edit window.
You can save now save the macro (for later use) by going to Macro : Save All.
8. Play the macro
Finally, to play the macro, go to Macro : Play Any Multiple Times.
Take a look at the result of running the macro:
Please note, it is always a good idea to first test the macro on sample data, to ensure it is performing as you intend it to.
Have fun writing macros!
