IDM PowerTips
Add a webpage to your toolbar
Did you also know that UltraEdit provides you with an interface for accessing the command line with the click of a button? Furthermore, you can build custom tools in UltraEdit that act upon the current file or selected text in the editor with the Windows command line. This gives you the power of integrating any external application, such as an internet browser, with your daily UltraEdit editing environment!
Here are just a few very basic things you can do with UltraEdit’s custom tools:
- Open your favorite browser
- Access your favorite webpage(s)
- Highlight a word or phrase and search it on your favorite search engine (click here to learn how)
- Check your HTML/CSS edits across multiple browsers for consistency (click here to learn how)
- Add your current file to a Zip archive
Read on to see how you can implement your favorite webpage tools in just a couple of quick and easy steps!

In order to follow this tutorial, it will help you if have a thorough understanding of user tools and toolbar customization.
To learn more about user tools, please visit our Power Tip “Creating User and Project Tools”.
To learn more about customizing the toolbar in UltraEdit, please visit our power tip on customizing toolbars in UltraEdit.
1. Create the User Tool to Launch the Webpage
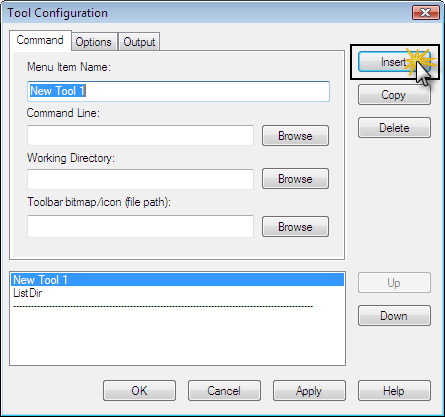
You will need to create a custom tool that will launch a specific webpage in the browser of your choice before you can add this to your toolbar. In order to do this, go to Advanced -> Tool Configuration and click “Insert“. Name your new tool something that will help you remember it. For our example, we will create a tool that launches www.ultraedit.com in a Firefox browser window.
Note: To learn more about running your favorite applications (web browsers, parsers, syntax checkers, etc.), search the help files of those applications for command line tips. For this Power Tip we will use Firefox’s command line parameters; you can choose to use a different browser if you’d like.

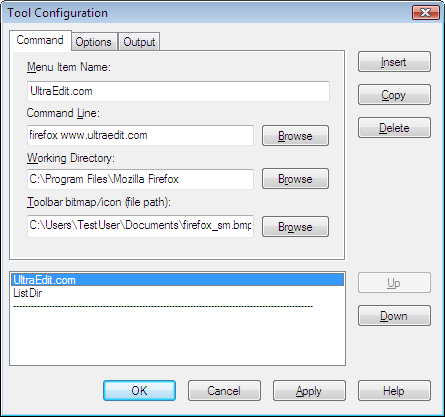
Enter the appropriate command line parameters, working directory, and custom bitmap (optional) under the “Command” tab as shown below.

Under the “Options” tab you should not have to configure anything. We have left this at its default settings (Program Type: DOS, nothing else selected).
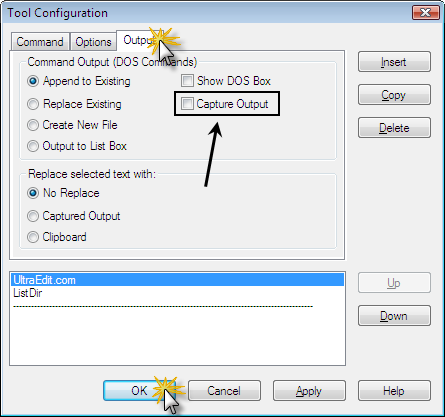
Under the “Output” tab we have left almost everything at its default, however we have unchecked “Capture Output” for this tool. A screenshot of our settings is below.
Finally, click OK to save your new tool.

2. Add the New Tool to the Main Toolbar
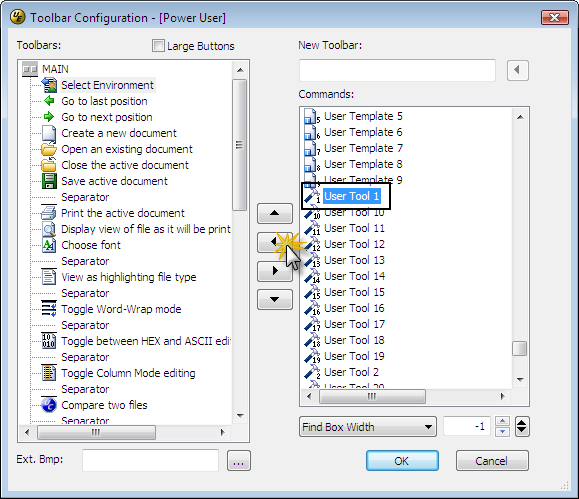
Access your toolbar configuration by right-clicking on the main toolbar and selecting “Customize Toolbar…” You can add your new tool by scrolling down to the user tools in the “Commands:” frame. Once you’ve located your tool, select it and press the LEFT arrow button to add it to the main toolbar. Use the UP and DOWN buttons to position your new tool exactly where you’d like it.

Click OK to save your toolbar customization and escape the toolbar configuration dialog. You will see your new tool on the main toolbar where you positioned it. Click on the icon to test your new toolbar item.
Below is a screenshot of our new tool with the Firefox icon. When clicked, a Firefox browser window will open and load www.ultraedit.com.


