Git integration in UltraCompare v19.00
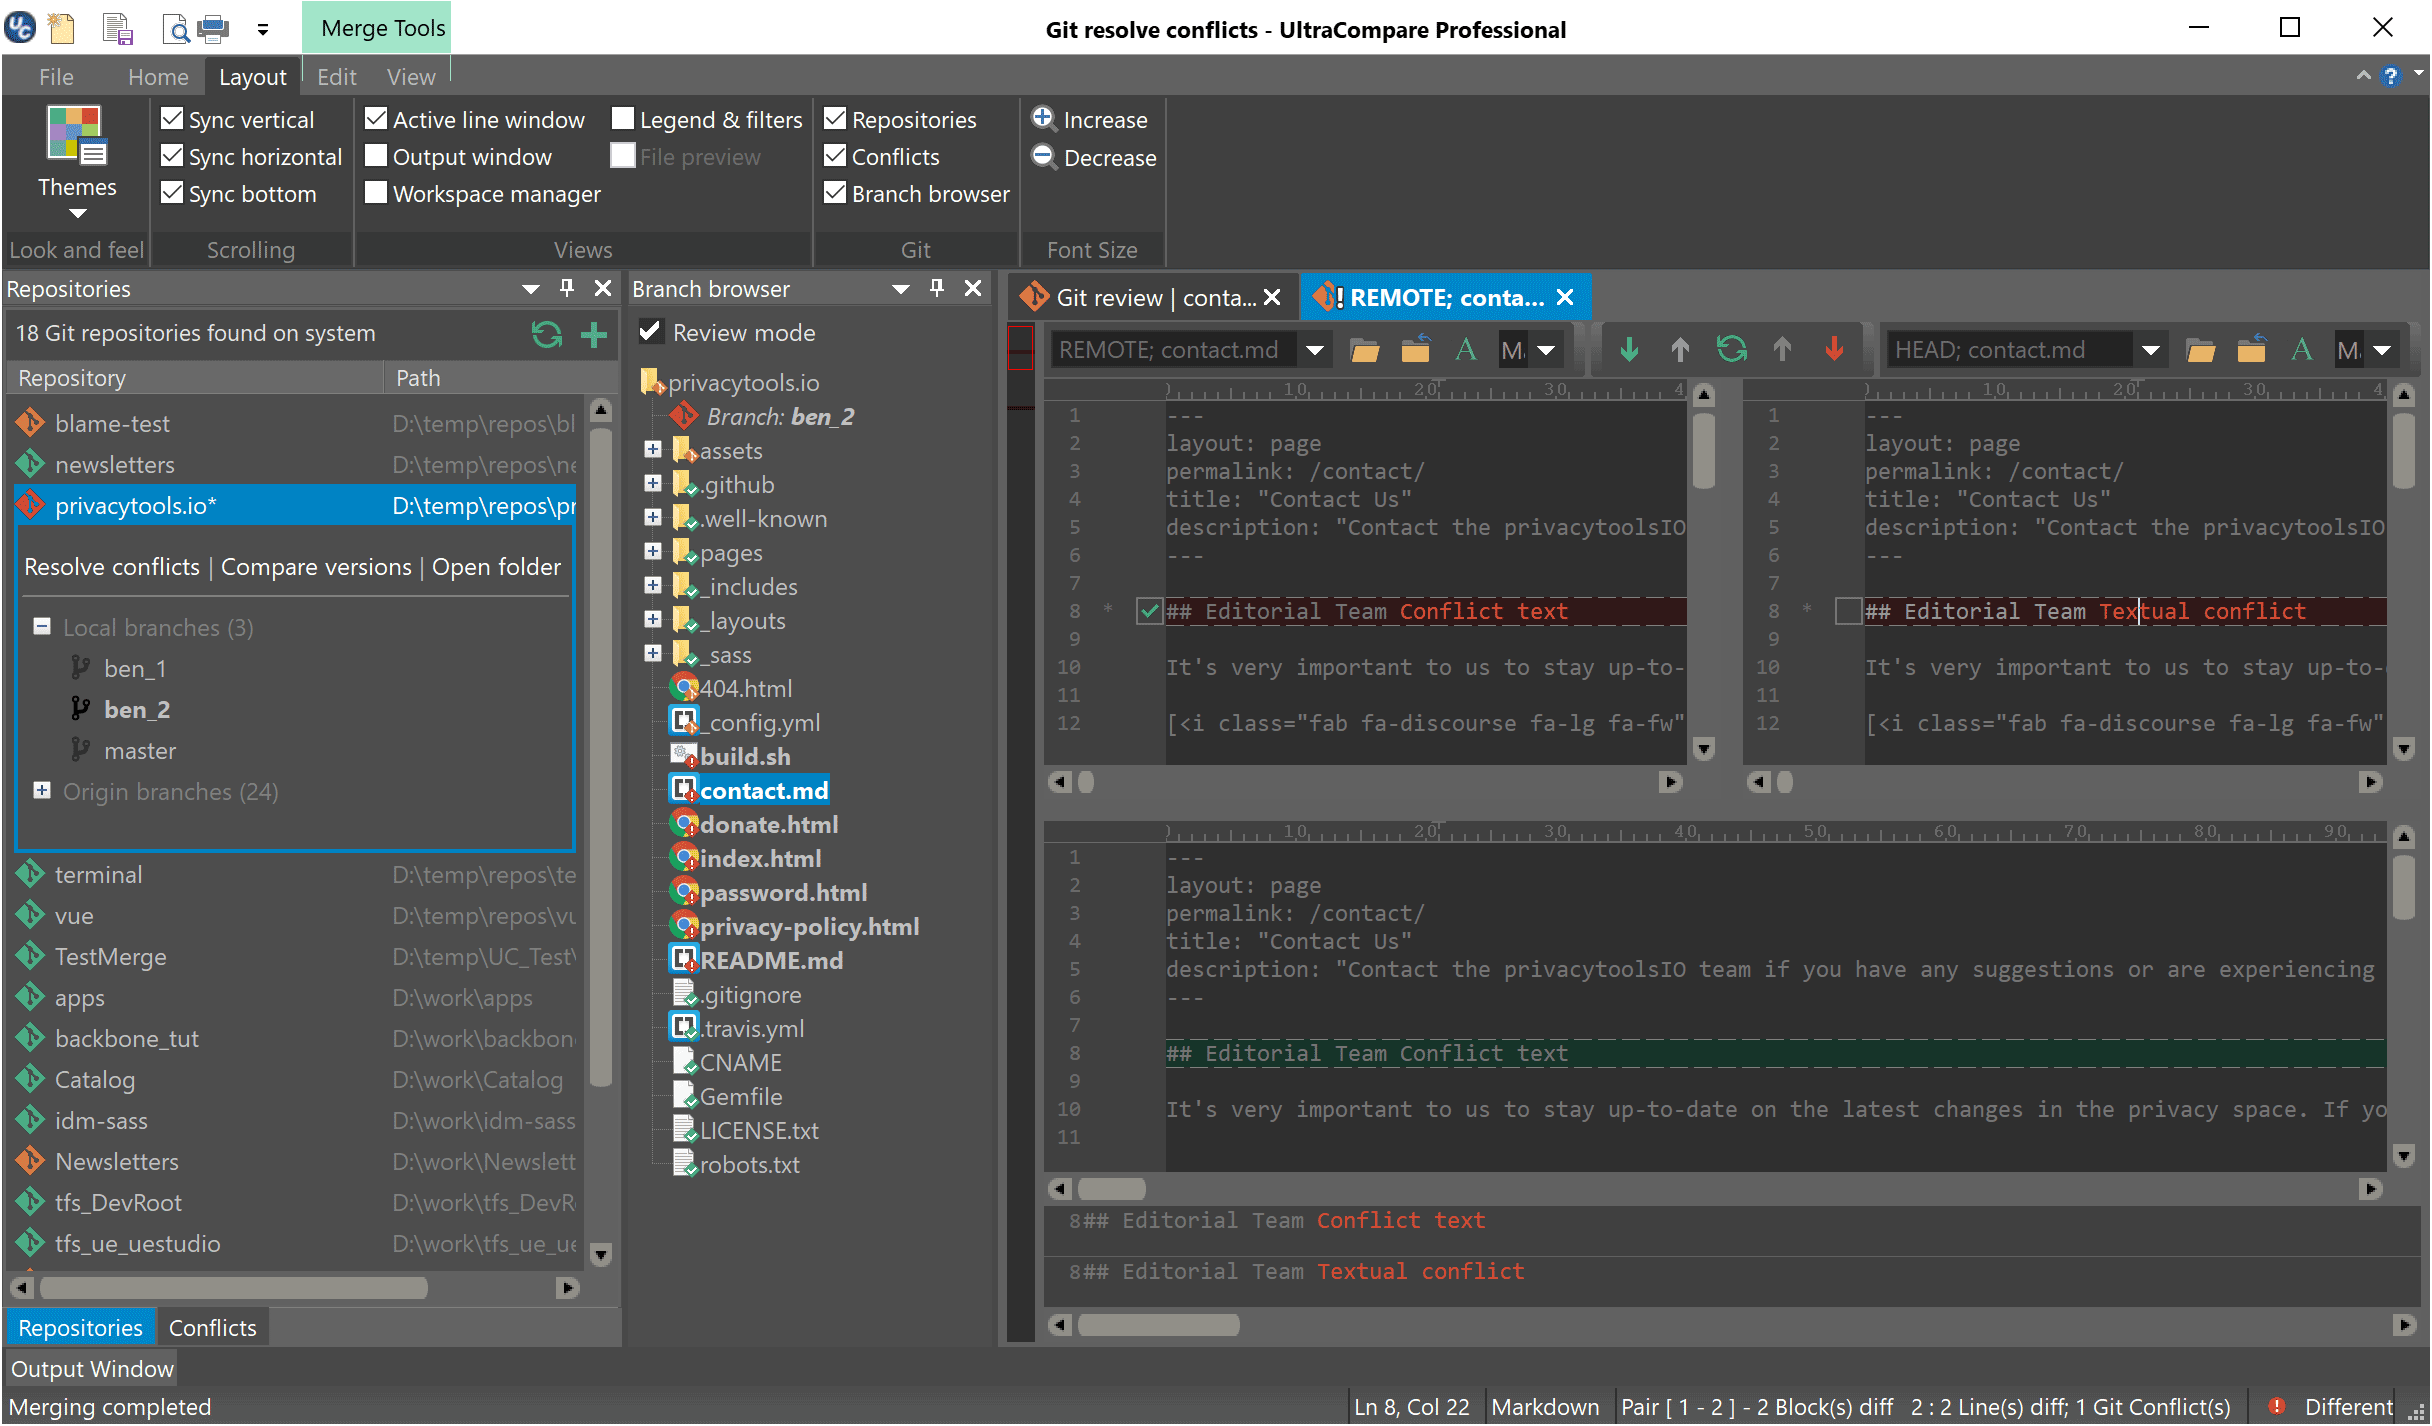
The new Git integration in UltraCompare has several components:
Don’t have Git? Download Git for Windows.
Git auto-detection
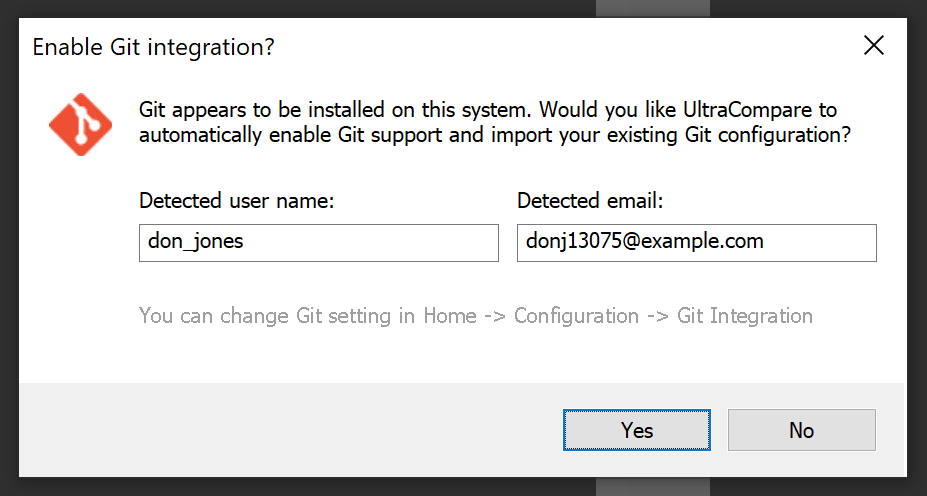
When you first start UltraCompare v19.00, you’ll be prompted to enable Git integration. This is a requirement to enable Git functionality in UltraCompare. You can toggle Git integration in Settings » Git integration.
UltraCompare will automatically populate the user name and email fields with the information from the .gitconfig file on your system. You can modify what is detected here or change it later in Settings » Git integration.
Repositories window
You can toggle the visibility of the Repositories window in the new “Git” group in the Layout ribbon.
The Repositories window is a list of all Git repositories UltraCompare has detected on your system, as well as all local and remote branches for the active / selected repository. On first run, UltraCompare will scan all attached local / internal storage drives for Git repositories and show them here. If you have Git repositories on other drives (for example, a USB drive or a network share) that UltraCompare doesn’t detect, you can add them by clicking the + button at the top-right of this window.
You can remove a repository from the Repositories list by right-clicking on it and selecting “Hide”. You can also manually add or remove locations to be ignored for Git repository scanning in Settings » Git integration by clicking the Exclude folders… button.
The repositories are shown with a Git icon in one of three possible states:
- A green icon indicates that the repository’s working directory has no uncommitted changes.
- An orange icon indicates that the repository’s working directory has at least one uncommitted change.
- A red icon, with an asterisk (*) next to the repository name, indicates that the repository’s working directory contains at least one file that is in a conflict state as a result of a previous Git merge.
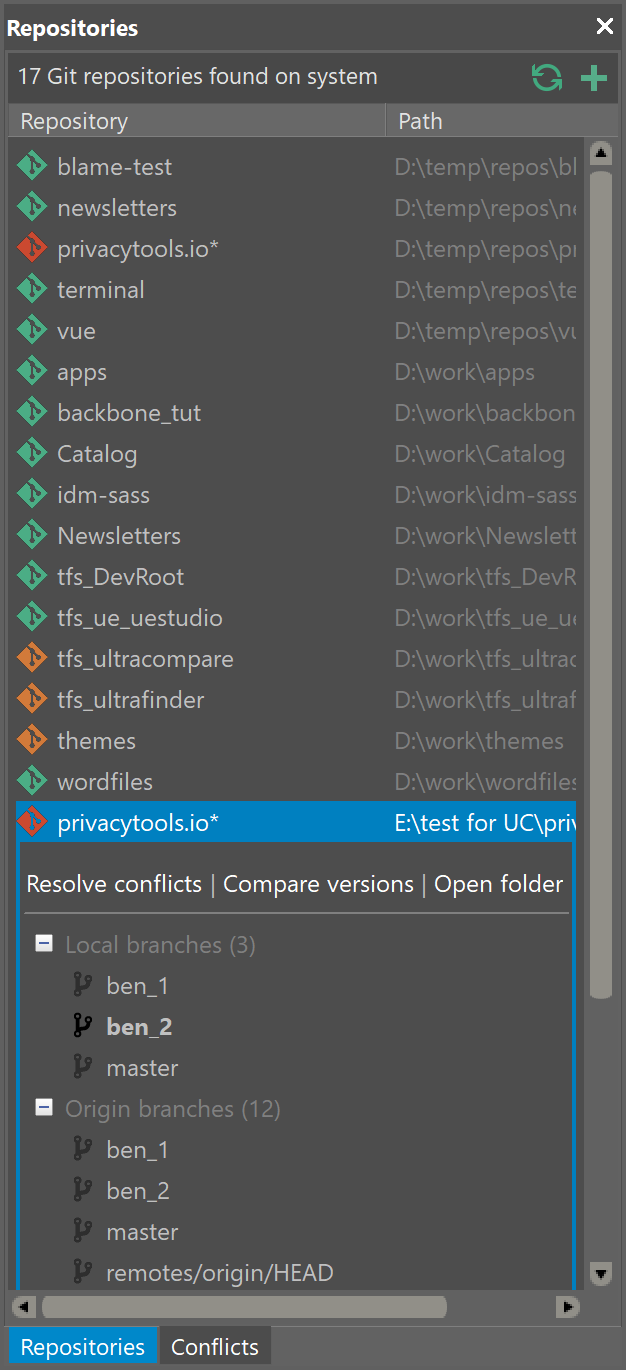
The selected repository within the Repositories pane is considered the active repository. When selected, the repository is highlighted and shown with the following options:
- Resolve conflicts
Clicking this option activates the Conflicts window, which includes a list of files in a conflict state for the active repository. This option is only available if the selected repository’s working directory contains at least one file in a conflict state. See Resolving Git merge conflicts section. - Compare versions
Clicking this option creates a new Git file version compare session where you can select a file to compare from the active repository. See the Comparing versions of a file in a Git repository section below for further details. - Open folder
Clicking this option opens the Git repository folder in Windows explorer.
Additionally, a list of all local and remote branches are shown underneath the selected repository, with the active branch shown in bold. The list of remote branches is collapsed by default. You can easily checkout a different branch by double-clicking on it.
“Branch browser” window
You can toggle the visibility of the Branch browser window in the new “Git” group in the Layout ribbon.
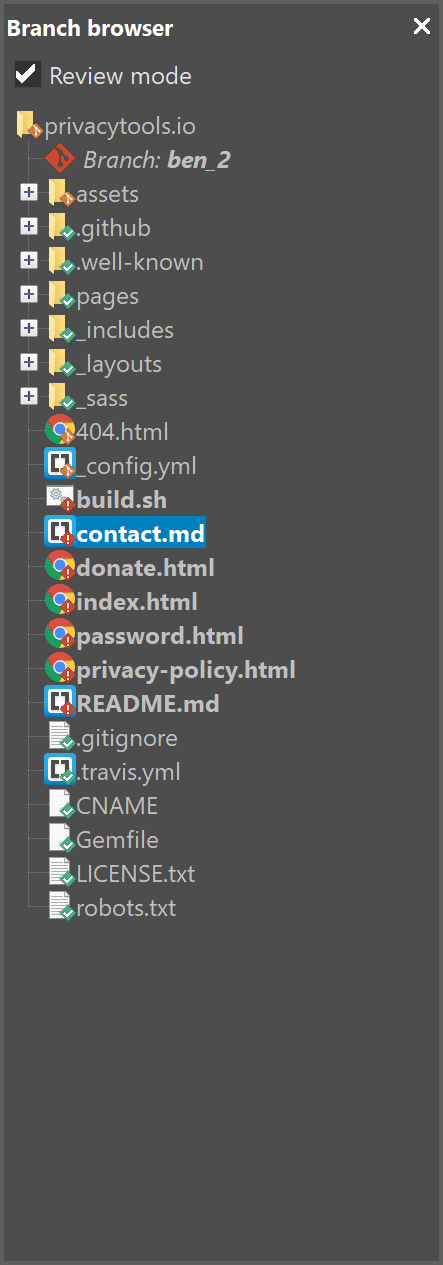
The Branch browser window provides you with a tree-style file listing of the active repository and branch. You can explore the files within the repository’s working directory, as well as see the Git status of individual files via the Git icon overlays.
- A green overlay indicates that the file is up-to-date with the repository.
- An orange overlay indicates that the files has changes that are not yet in the repository.
- A red overlay indicates that the file contains merge conflicts that must be manually resolved before it can be staged and committed to the repository.
The Review mode checkbox at the top of the branch browser allows you to toggle a special “Git review” session. With this enabled, clicking a file in the branch browser will open a read-only compare of the working copy of the file against the repository version, so you can see what uncommitted changes are in the file.
The context menu in the Branch browser offers the following options:
- Sort files by Git status (only shown for root folder and branch)
This will sort files in the tree view by their Git status, (modified, then conflicts, then up-to-date). - Resolve conflicts… (only shown for files with conflicts)
This opens a new Git resolve conflicts with the selected file. See the Resolving Git merge conflicts section. - Compare versions…
Clicking this option creates a new Git file version compare session where you can select a file to compare from the active repository. See the Comparing versions of a file in a Git repository section below for further details. - Refresh
This forces UltraCompare to check the status of the repository / branch and updates the file listing in the Branch browser.
Conflicts window
You can toggle the visibility of the Conflicts window in the new “Git” group in the Layout ribbon.
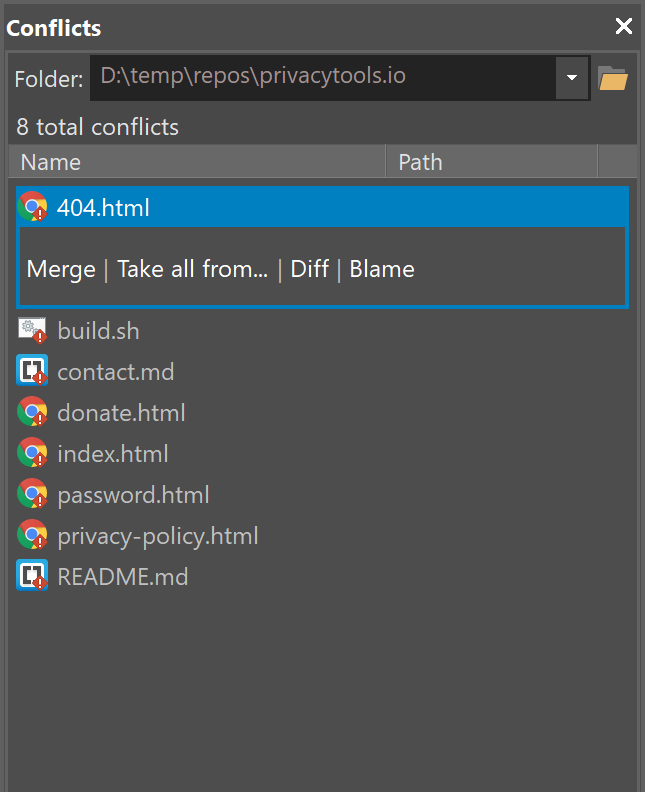
The Conflicts window includes a list of all files containing Git merge conflicts within the active repository (see Repositories window section). The “Folder” field shows the full path to the folder on the local file system. You can use the Open button to open a folder anywhere on the file system that contains Git conflicts.
For the selected conflict file, UltraCompare provides the following options:
- Merge
This opens a new Git resolve conflicts with the selected file. See the Resolving Git merge conflicts section. - Take all from local / remote
This option allows you to quickly accept all changes from the local or remote branch for the active file. Using this option will automatically and permanently resolve conflicts for the file without any user interaction. - Diff
This will open a read-only compare of the local and remote versions of the conflict file. This allows you to view the conflicts but not actually merge them. - Blame
This opens the Git blame log for the file in a separate window.
Git integration in Explorer tab
You can see Git repository information directly in the Explorer tab of the Workspace Manager. The parent folder of a Git repository, as well as all items within it, are shown with special Git icon overlays which indicate the item state:
- A green overlay with a checkmark indicates that the item is up-to-date in the repository and has no uncommitted changes.
- An orange overlay indicates that the item contains uncommitted changes.
- A red overlay indicates that the file contains merge conflicts.
- A question mark overlay indicates that the item hasn’t been added to the Git repository.
- A gray overlay indicates that the item is ignored by the repository’s .gitignore rules.
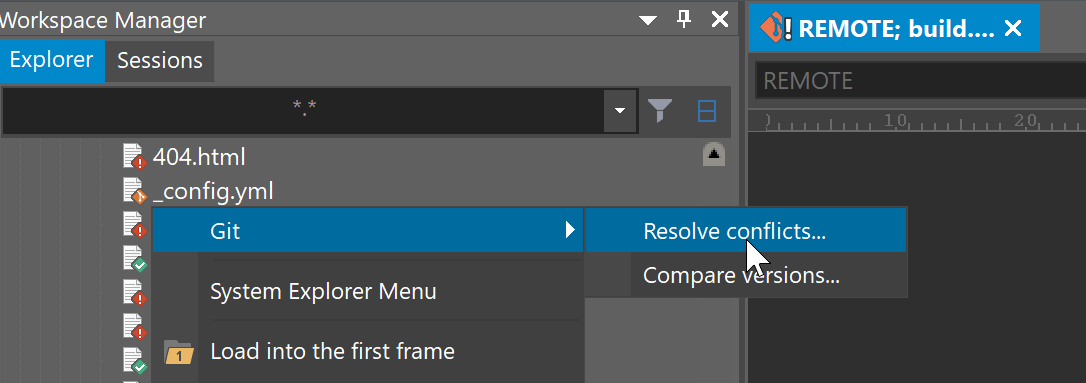
Additionally, you can right-click on the top-level Git folder, or any item within it, to access a “Git” sub-menu in the context menu.
- Resolve conflicts
- For a folder, this option will activate the Conflicts window. This option is disabled if the folder contains no files with merge conflicts.
- For a file, this option will both activate the Conflicts window and open a resolve conflicts session with the selected file. This option is subdued if the file contains no merge conflicts.
- Compare versions
- For a folder, this option will activate the Repositories window and open a new Git version compare session with the repository pre-selected.
- For a file, this option will activate the Repositories window and open a new Git version compare session with both the repository and the file pre-selected.
Resolving Git merge conflicts
When you have a Git repository with merge conflicts, you can use UltraCompare to diff, view, and resolve these conflicts. You can do this via one of two ways: Git’s mergetool feature, or native conflict resolution..
To set UltraCompare as Git’s mergetool on your system, see the Git mergetool / difftool support section. No configuration is required to use UltraCompare’s native conflict resolution functionality.
To resolve conflicts for a particular file, you can do one of the following:
- Select a file in the Conflicts window, then click Merge
- Right-click on the file in the “Explorer” tab, and from the context menu, select Git » Resolve conflicts…
- Select Git resolve conflicts from the new session menu or the welcome page
- Run mergetool from Git on the file (if UC is configured as mergetool)
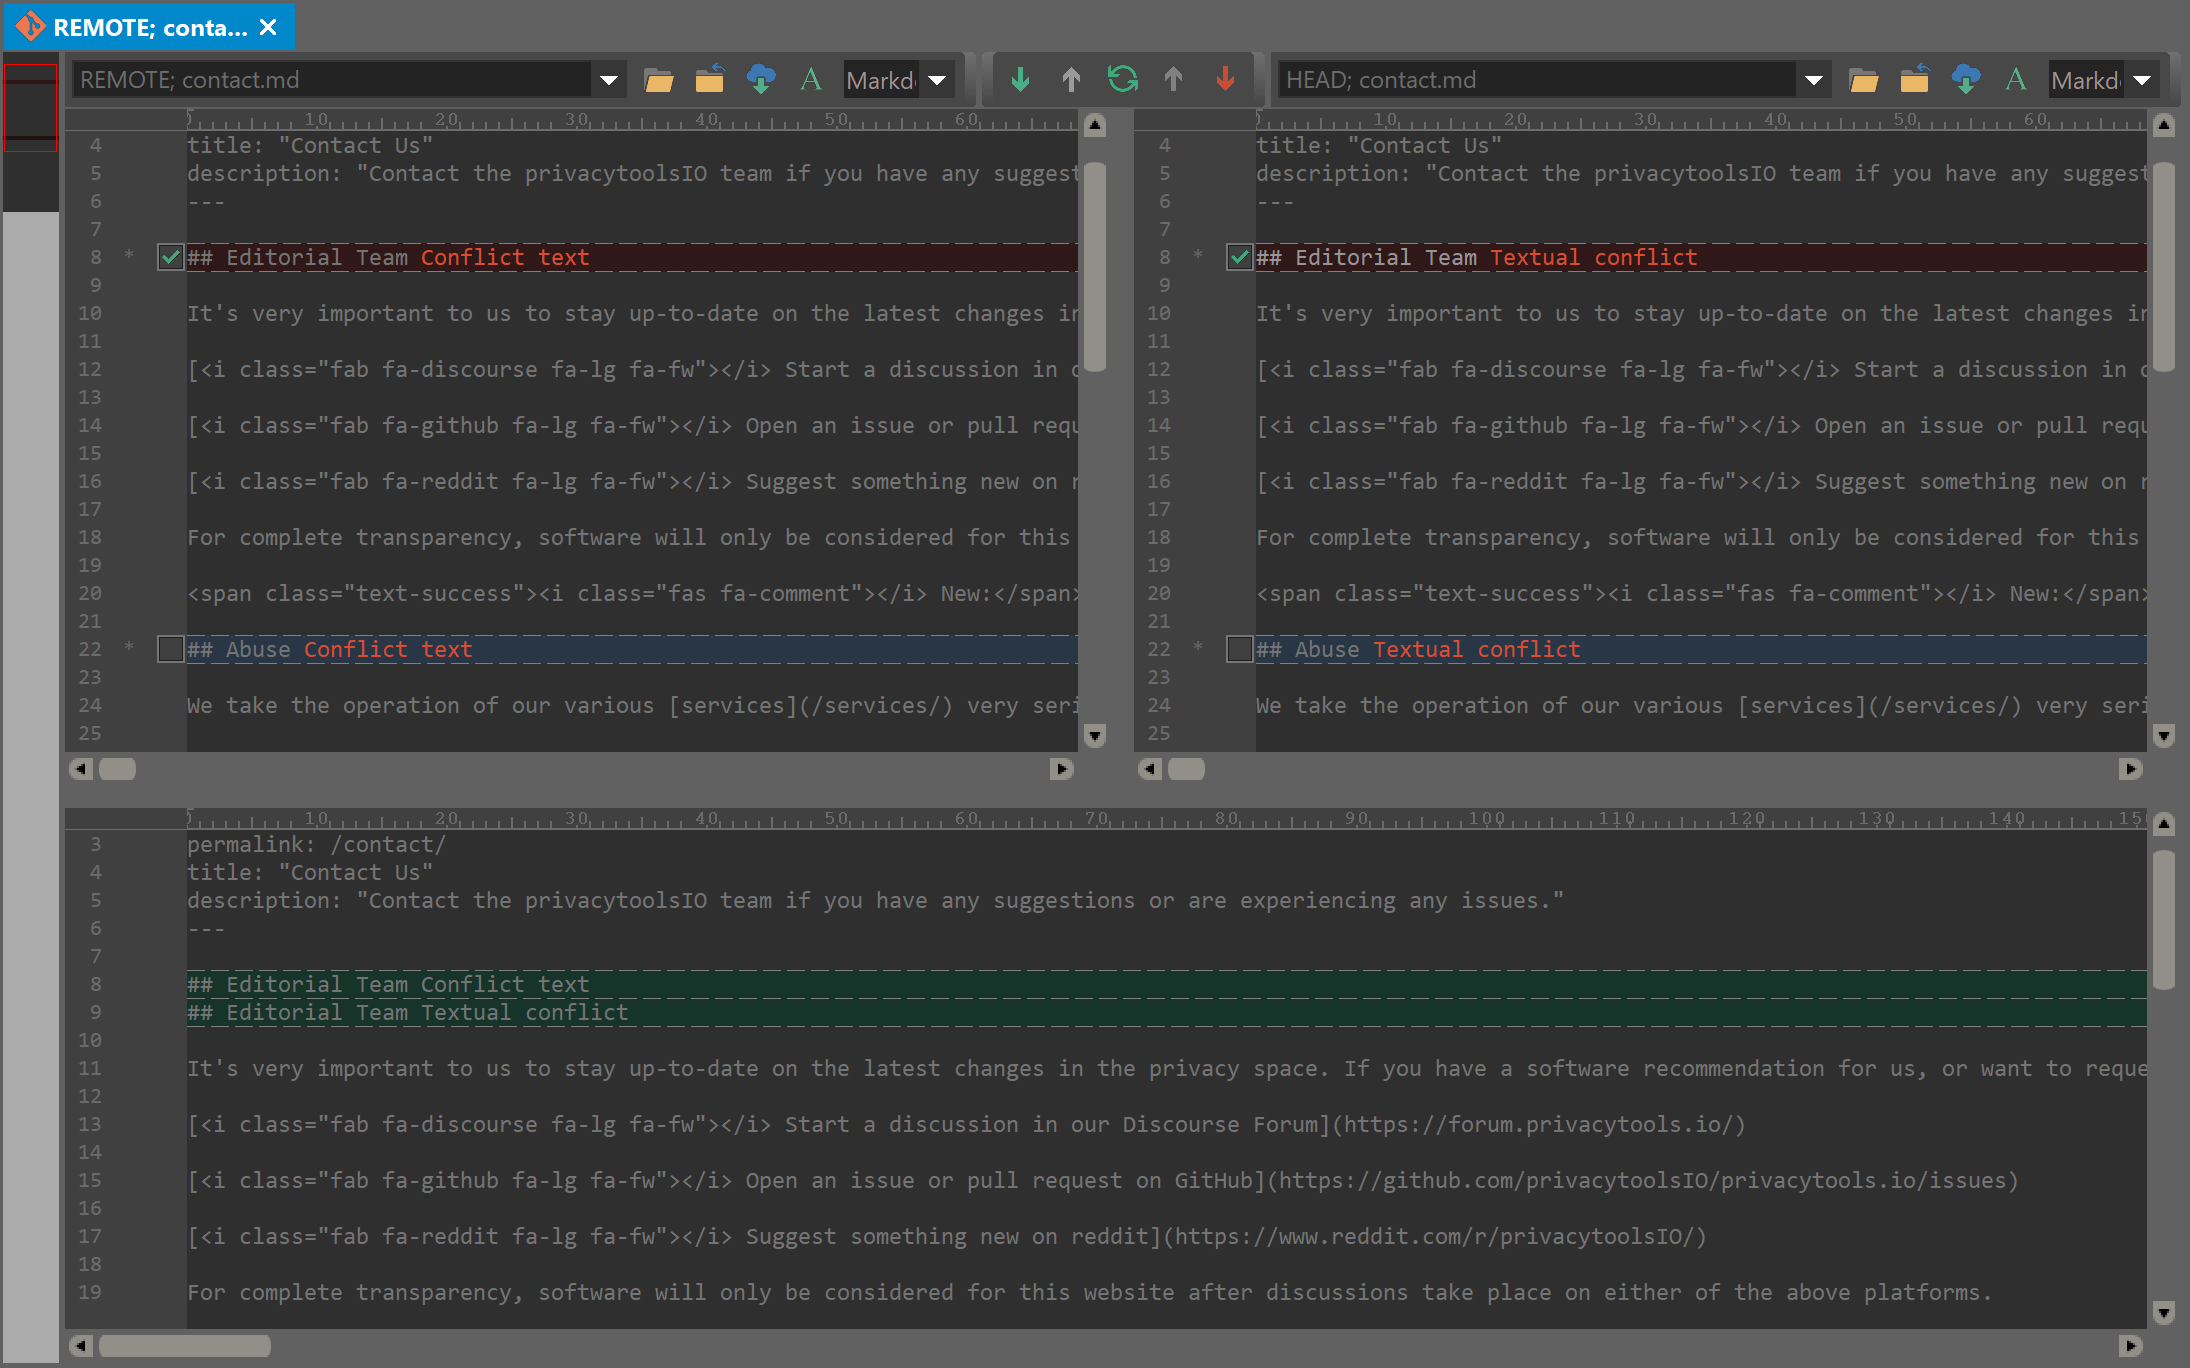
Doing one of the above will open a new “Resolve conflicts” session, with a special three-pane layout for conflicts resolution:
- The left pane shows the remote version of the file; i.e., the branch that was merged into the current branch.
- The right pane shows the local or HEAD version of the file; i.e., the version from the current / active branch.
- The bottom pane shows the merged result. As you resolve conflicts, the result will be displayed here. When you close the session and confirm all conflicts are resolved UltraCompare will replace the file with this result. From there, you can commit the file externally.
UltraCompare adds a checkbox inside the line number margin for each conflict between the local and remote versions. You can use this checkbox to select which difference block – local, remote, or both – is added to the merged result. If you select both differences, the one you checked first will be added above the other.
You can use the red “Next conflict” and “Previous conflict” arrows in the navigation control bar above the panes to quickly cycle through the conflicts in the file.
In this mode, you cannot edit the local and remote versions of the file; they are read-only. However, you can modify the result file in the bottom frame as desired during the session. At any point during a “Resolve conflicts” session, you can press Ctrl + S to save your changes to the file up to that point.
Once you have resolved all conflicts to your liking, you can close the session. UltraCompare will ask you whether or not to mark the file as resolved. If you say yes, the file is staged as though all conflicts are resolved, and you can commit it externally towards completion of the Git merge.
Git version compare
Often it’s useful to compare a file from a Git repository to a previous version of itself. UltraCompare makes this possible with the new “Git version compare.”

You can launch a version compare by one of the following methods:
- Click Compare versions under the selected repository in the Repositories window
- Right-click on a repository file in the “Explorer” tab, and from the context menu, select Git » Compare versions…
- Select Git version compare from the new session menu or the welcome page
Version compare mode is different than other compare modes. Instead of selecting two different files to compare, Git version compare allows you to choose one file from a Git repository and then compare two different versions of it. The controls above the compare frames facilitate this. These controls include the following components:
- Repository
This allows you to select the repository from which to compare a file’s versions. If you launch version compare from the Repositories window, this will default to the selected repository. - File
This allows you to select the file to compare. All files from the repository are listed in the drop down. You can also use the Open button to select the file through a regular file open dialog. - Branch
This allows you to select the branch for both the left and right pane, making it possible to compare versions from different branches. - Commit
This allows you to select the version of the file for each frame. The commit information in the drop down is the commit hash, commit date, author, and commit message.
Once the commits have been selected, you can press the green Play button to run the version compare. You can use the “Next diff” and “Previous diff” arrows in the navigation control bar above the panes to navigate throughout the differences. However, this is a read-only compare so merging between the two files is not possible.
While in version compare mode, UltraCompare will also show a “Git blame” tooltip for differences in both frames. To see this tooltip, simply hover next to the line number in the margin.
Git mergetool / difftool support
UltraCompare supports Git’s difftool and mergetool features by introducing new command line parameters. You can automatically enable UC as difftool / mergetool for Git by going to Settings » Git Integration and checking the option Set UltraCompare as diff/merge tool for all repositories.
If you wish to set up difftool manually in the .gitconfig file, you can use the following:
[diff]
tool=ultracompare
[difftool “ultracompare”]
keepBackup=false
trustExitCode=false
prompt=false
cmd=”uc.exe -gitdt “$REMOTE” “$LOCAL” “$MERGED” -title1 “REMOTE” -title2 “LOCAL””
To manually set UC as mergetool in the .gitconfig file, use the following:
[merge]
tool=ultracompare
[mergetool “ultracompare”]
keepBackup=false
trustExitCode=false
prompt=false
cmd=”uc.exe -gitm “$REMOTE” “$LOCAL” “$BASE” “$MERGED” -title1 “REMOTE” -title2 “LOCAL””
Configuration
The following options are available under Settings » Git Integration:
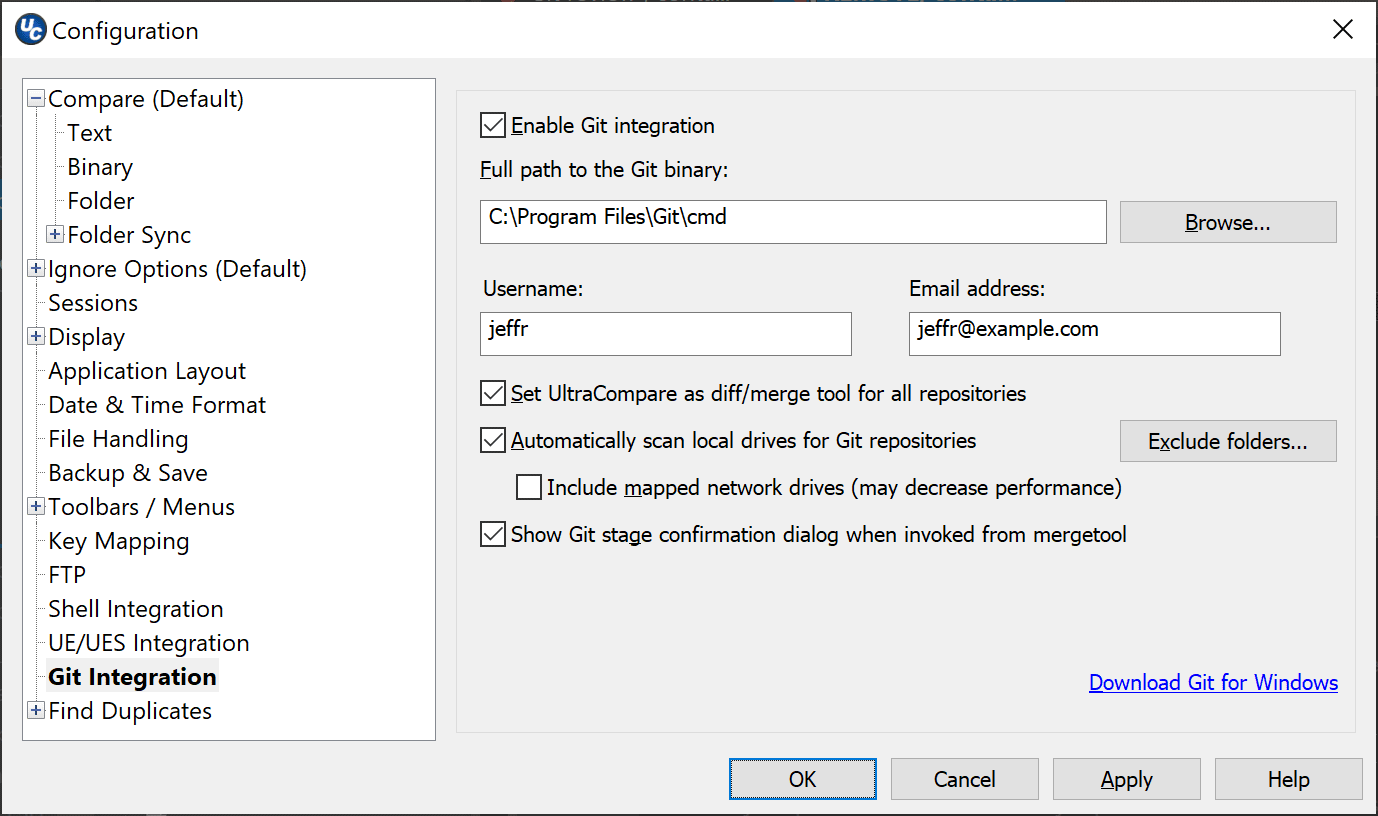
- Enable Git integration
This checkbox controls whether or not Git integration is enabled in UltraCompare. Unchecking this will cause UltraCompare to disable all integrated Git functionality. Mergetool support via the command line is still available. - Full path to the Git binary
If UltraCompare detects Git on the system, it will automatically set here the path to the folder containing the Git for Windows binaries. If this is not automatically detected, you can type the full path or use the Browse… button to navigate to the correct location. If you don’t have Git for Windows installed, you can download it at https://gitforwindows.org/. - Username and Email address
These fields are automatically populated with the Git user info from your system’s .gitconfig file. You can manually modify them here. This information is used to complete commits after merges, for example. - Set UltraCompare as diff / merge tool for all repositories
Checking this option will set UltraCompare as the default difftool and mergetool for all Git repositories via the global .gitconfig file. See the Git mergetool support section. - Automatically scan local drives for Git repositories
This option controls whether or not UltraCompare will automatically scan attached local hard drives for Git repositories to be listed in the Repositories window of the Workspace Manager. By default, UltraCompare will scan on every application start. Caching is used so that known repository information is retained between sessions. Unchecking this option will prevent this behavior, and repositories would have to be added via the Add button in the Repositories window. You can use the Exclude folders… button to specify folders (or drives) that you would like excluded from this scan, and therefore excluded from repository detection. - Include mapped network drives (may decrease performance)
If checked, UltraCompare will include network drives in the repository scan. As indicated, because of latency inherent to networks, this may cause performance issues. - Show Git stage confirmation dialog when invoked from mergetool
This option controls whether or not UltraCompare will prompt to stage a file opened via mergetool from the command line. The prompt includes a “Don’t show again” checkbox, and this checkbox allows you to reset that option.
Learn about our Git Editor & Compare Workspace.

