UltraEdit PowerTips
Adding a wordfile
We are frequently asked if we can add support for a given language. The answer to this question is, UltraEdit-32’s syntax highlighting is user configurable based on the wordfile. Therefore, if you can append to your wordfile, you can add syntax highlighting support for your desired language. You may have highlighting for as many as 20 languages specified in your wordfile.
We have user-submitted wordfiles available for download here. The following steps will guide you through appending to your wordfile.
Adding a Wordfile
Step 1: Open your default wordfile.
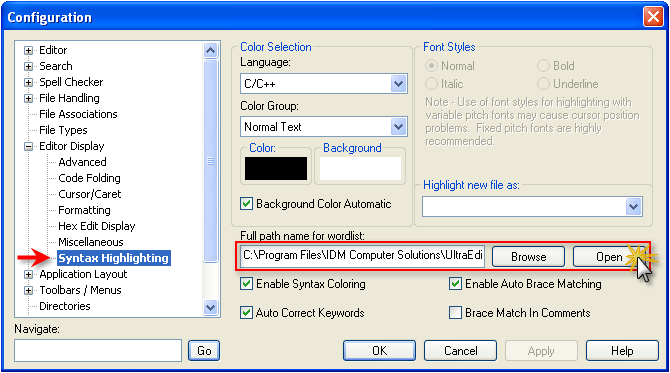
You can find/open your default wordfile by going to Advanced : Configuration : Editor Display : Syntax Highlighting and clicking ‘Open’ (in the ‘Full path name for wordlist’ field).

Step 2. Open the new wordfile in UltraEdit
Open the downloaded wordfile in UltraEdit.
If you have not downloaded a wordfile yet, please do this now. You can download wordfiles here.
After you have opened the wordfile in UltraEdit, copy the entire contents of the new wordfile.
Step 3. Paste the new wordfile
Go back to the default wordfile, which was already opened in UltraEdit, and Paste the contents of the clipboard (the downloaded wordfile) at the end of the default wordfile.
Please make sure that the wordfile you just pasted to the default wordfile does not have a duplicate language number.
The language is specified by a /Ln where n has a value of 1 to 20. This is at the beginning of the line.
Step 4. Save the wordfile.
Save the file using File : Save, or CTRL + S.
Step 5. You are finished
Any files opened after saving the modified wordfile, which have an extension matching those defined in the wordfile, will be highlighted accordingly.


