
UltraEdit PowerTips
Search and find text in files with UltraFinder
UltraFinder is the ultimate text search program! No matter where your files are – on a local drive, an attached storage device, a network drive, or even a remote FTP server – UltraFinder will find the text you’re looking for…and find it fast!
1. Define find locations (where you want to search)
The first step to find text in files is to determine where you want to search. You may want to search a single folder or drive, or you may want to search multiple folders/drives. You may even want to narrow your search to a specific file itself. This is all possible with UltraFinder.
")
To add a folder or an entire drive to your search, either type in the path (for example, “C:”, or “C:\temp”) into the address bar and press enter, or click the blue folder icon to browse to and select the folder or drive.
To add an individual file or files to your search, either type in the full path to the file (for example, “C:\temp\test.txt”) into the address bar and press enter, or click the file icon to browse to and select the file you wish to add.
Note: To search for text on an FTP site, please see the Search and find text in FTP files power tip.
There are two additional options beneath the Find locations list:
[ ] Search sudirectories
If checked, UltraFinder will perform a recursive search for text, descending into all subdirectories contained within your find locations.
[ ] Ignore hidden subdirectories
If checked, UltraFinder will not search for text in subdirectories that are hidden on your OS.
2. Specify text to find
You can tell UltraFinder what text to find by simply typing or pasting the search text into the Find what field.
")
Note: you can add a line break (CR/LF) to your find text by pressing Ctrl + Enter.
3. Set filtering options
You can execute your find now if you wish, but what if you want to filter your search to ignore certain subdirectories or certain file types?
For example, if you wanted to run your text search in web files only, you could add the following to UltraFinder’s In files/types field: *.htm;*.html;*.css;*.js;*.php
To search files only containing a specific string in the name, regardless of extension, use the string and an asterisk as a wildcard. For example, adding *index* to this field will instruct UltraFinder to only search in files with “index” as part of the file name.
Or, suppose you also have a subdirectory called “logs” which contains very large log files which you do not wish to search. You can type this folder name into the “Ignore subdirectories” field, and any folders named “logs” that UltraFinder encounters during the search will be skipped. You can also provide a full folder path in this field.
Finally, suppose you wish to search for text in all files except those files with a .log extension. You can tell UltraFinder to ignore .log files by adding *.log into the “Ignore files/types” fields.
")
You can use a combination of the above to fine-tune your text searching. The more specific you make your filters, the less time it will take to execute the search!
4. Set find options
On the right side of the app, there are some additional find options that you can enable for finding text in files with UltraFinder.
")
[ ] Find matches by File contents or File name
This controls whether you are searching for text in a file, or searching for text in a file name. For text searching, make sure to set this to File contents. To see how to search for files by name, please see the Find files by name power tip.
[ ] Regular expressions
This allows you to use regular expressions in your find text. By using a few special symbols, regular expressions match a pattern of text rather than a specific string of text. You can learn more about UltraEdit and Unix style regular expressions here and Perl regular expressions here.
[ ] Match whole word
If checked, UltraFinder will only match the find string if it is enclosed in word boundaries ( space, comma, period, etc.). Check this option if you want to find, for example, the word “fire” by itself, but not “firetruck”.
 [ ] Match case
If checked, UltraFinder will execute a case sensitive text search in files.
[ ] Find non-matching lines
If checked, UltraFinder will match lines in files that do NOT contain your search text and return these in the results. This is sometimes called a reverse search or negative search.
[ ] Match if string not found
If checked, UltraFinder will return a list of files which do not contain the search text. The difference between this option and the Find non-matching lines option is that, with this option, the search text cannot exist anywhere in the file, whereas with the above it can.
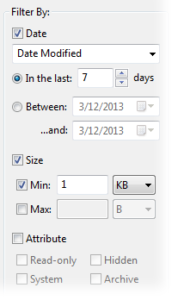
[ ] Filter by date modified/created
This setting allows you to restrict the search to a specific date range. For example, you may want to only search files that have been modified within the last 7 days.
[ ] Filter by size
This settings allows you to restrict the search to files within a specified size range.
[ ] Filter by attribute
This settings allows you to restrict the search to files with specific attributes.
5. Execute search and examine results
Now that your search is configured, run it by clicking Start. Once the search is complete, you will see the find results written to the results window.
")
Each file containing your search text is listed in the results window with a light gray background. You can sort the files containing the search text by clicking on the column headers. For example, clicking on the Created column header will sort the files from oldest to newest. Clicking Created a second time will sort the files from newest to oldest.
Beneath each file is a collapsible list of the lines within the file that contain the search text, preceded by the line number where it occurs. If you cannot see the entire line, hover your mouse over it, and a tooltip will open displaying the entire line’s contents.
You can collapse or expand everything by right-clicking on a file result (with a gray background) and selecting Expand All or Collapse All.
You can double-click a file or line result to open that file in its associated application. When double-clicking a line result, if the file’s associated application is UltraEdit, the file will be opened in UltraEdit with the caret positioned at the associated line!
You can also compare files from the results window by selecting one or more files, right-clicking them, and selecting Load in UltraCompare.
Finally, you can right-click on the results to copy them in any variety of ways to the clipboard or open them as a new file in UltraEdit!
Happy searching!